Saturday, March 29, 2008

Starting with lighter weights

If you’re planning to do more than one set of an exercise, start by performing eight to ten repetitions with a light weight. A warm-up set is like a dress rehearsal for the real thing — a way of reminding your muscles to hit their marks when you go live. Even monstrous bodybuilders do warm-up sets. Sometimes you’ll see a human hunk of muscle bench-pressing with just the 45-pound bar. Just as you’re thinking, “What a wimp,” he piles on so many weight plates that the bar starts groaning. Then you realize that the first set was just his warm-up.

If you get too cocky and head straight for the heavy weights, you risk injuring yourself. With weights that are too heavy for you, you’re playing with some risky behaviors.
  • Losing control of the weight
  • Dropping the weight on yourself or on someone else
  • Straining so hard to lift the weight that you tear a muscle
  • Ending up so sore that you can barely lift your feet up high enough to climb stairs.
One or a combination of these accidents can cause a lapse in your workout as you may have to take time off to recover. Be smart and start with lighter weights — weights that you can lift for more reps before you reach fatigue. Then challenge your body by increasing the weight over time. A personal trainer at the gym can also help you target a starting weight for your repetitions.

Lifting weights too quickly doesn’t challenge muscles effectively and is a pretty reliable way to injure yourself. When you’re pressing, pushing, lifting, or extending at the speed of a greyhound, you can’t stop mid-rep if weight plates come loose, you’re positioned incorrectly, or something just doesn’t feel right. So take at least two seconds to lift a weight and two to four seconds to lower it. Some experts feel that you should move even slower than that. If you’re banging and clanging, slow down your pace.

Warming up before you lift

Before you start your training session, warm up your body with at least five minutes of easy aerobic exercise (see below for suggestions). Your warm-up increases circulation to and the temperature of your working muscles, making them more pliable and less susceptible to injury. Your warm-up also lubricates your joints. The pumping action of your bones at the joints stimulates the release of synovial fluid, which bathes your joint and keeps it moving smoothly, as if you’re oiling a mechanical joint. If you have a particularly heavy-weight workout planned, warm up for ten minutes. Warm up your muscles by using Active isolated stretching (AI). AI involves tightening the muscle opposite to the one that you’re planning to stretch and then stretching the target muscle for two seconds. You repeat this process 8 to 12 times before going on to the next stretch.
Walking, jogging, stairclimbing, and stationary biking are also excellent aerobic warm-up activities for the muscles south of your waistline. But to prepare your upper body muscles, you need to add extra arm movements to these activities.
  • Vigorously swing your arms as you walk, jog, or use the stairclimber.
  • When you ride the stationary bike, gently roll your shoulders, circle your arms, and reach across the center of your body.
  • Use an aerobic machine that exercises your entire body, such as a rower, cross-country ski machine, or stationary bike with arm handles. (Many gyms have the Cybex Upper Body Ergometer [UBE]; ask a trainer where you can find the UBE.)

Weight Training Safety

Forget what your Grandma told you. Truth is — there’s nothing inherently unsafe about weight machines or barbells. It’s what you do with these contraptions that can leave you with smashed toes, ripped hamstrings, and torn tendons. If you pay attention, use proper form, and don’t get too macho about how much weight you lift, you can go for years without even a minor injury. In fact, one of the best reasons to lift weights in the first place is to reduce your risk of injury in daily life by strengthening your muscles and bones.
Follow the safety tips in this chapter, and you’ll walk out of the weight room the same way you entered it: in one piece and under your own power. We said that weight training is safe and that you can go a lifetime without a minor injury, but with that said, you may feel occasional muscle soreness —especially if you’re new to the game or haven’t worked out in a while. A little bit of post-workout soreness is okay; chances are, you’ll feel tightness or achiness 24 to 48 hours after your workout, rather than right away. (This postponed period is called Delayed Onset Muscle Soreness, for those of you who feel more comfortable when your pain has a name.) But there are ways to reduce your amount of discomfort so you can be a normal, functioning human being after your workout. The following guidelines can help you keep this soreness to a minimum.

Monday, March 24, 2008

Lifting your body weight

Why is it that certain exercises can be quite challenging even though you’re not holding any weights or using a machine. In these cases, you’re not lifting zero weight; you’re lifting your body weight. With a number of exercises, moving your own body weight offers plenty of resistance, especially for beginners. The effectiveness of an exercise without equipment depends on how much of your weight you actually have to move and how hard you have to work to overcome the force of gravity. In the military version of the push-up, you have to push your entire body upward, directly against the force of gravity. The modified push-up, where you’re balanced on your knees rather than your toes, factors out the weight of your legs so the exercise is easier. Neither exercise requires you to hold a weight, but both versions can be tough.

Buckling Down on Bands and Tubing

Giant rubber bands and rubber tubes provide a muscle resistance workout for just pennies. These inexpensive items can’t make you as strong or measure your progress as precisely as machines and free weights, but bands do challenge your muscles in different and effective ways. For example, because bands don’t rely on weight or gravity for resistance, bands provide a challenge during both the up and down motions of an exercise. With most free weight and weight machine exercises, on the other hand, you typically feel most of the resistance during the lifting portion of the exercise, because gravity assists in the lowering portion.
Rubber bands and tubes are also convenient and portable. (You can’t exactly pack dumbbells in your overnight bag.) If you don’t have access to machines, bands are a great supplement to free weights because they allow you to do exercises that aren’t possible with dumbbells and bars.

Coming to grips with cable attachments

At most gyms, you see a large heap of metal bars and handles sitting in a plastic container or milk crate. This pile may look like junk but, actually, it’s more like a treasure chest. By attaching these handles to a cable pulley, you create an unlimited variety of exercises.
Some people are afraid to go near this pile, so they simply use whatever bar happens to already be attached to the cable. But if you frequently switch the handles, your workout can be more fun. Here’s a rundown of the most popular cable attachments:
  • Ankle collar: You clip this wide leather ankle bracelet to the pulley to perform exercises such as leg lifts, back kicks, and leg curls. The ankle collar can strengthen your inner and outer thighs while you’re standing. We don’t use the ankle collar in this book, but a trainer can fill you in on the details.
  • Curved short bar: Some of these are U-shaped and some are V-shaped. Both varieties are used almost exclusively for triceps exercises, such as the triceps pushdown.
  • Long bar: These bars come in various lengths and are commonly used for back exercises that involve pulling the bar to your chest. You can pull these bars with an underhand or overhand grip, and you can place your hands as far apart or as close together as you like.
  • Rope: This attachment is most commonly used for triceps exercises such as the triceps pushdown.
  • Straight short bar: This bar is used in triceps exercises, biceps curls, and rows. We especially like to use this bar for the triceps pushdown and the seated cable row.

Wednesday, March 19, 2008

Smith machines and power cages

The Smith machine: The Smith machine —named for an influential 1970s fitness figure named Randy Smith — features a regular free-weight bar trapped inside a track so that the bar must travel straight up and down. The Smith machine increases the safety of exercises such as bench presses, overhead lifts, and squats because you don’t have to worry about the bar wobbling or slipping from your grip. At the same time, the machine retains the feel of free weights. Many Smith machines possess another safety feature: self-spotting pins jutting out from the frame. These pins prevent the bar from being lowered below a certain point, so there’s no chance you’ll get crushed under the bar if the weight is too heavy. Smith machines use a traditional 45-pound bar, but in some cases, the bar balances on springs to negate most or all of its weight. The purpose is to add smoothness to the movement. Many lifters don’t like this feature because it takes away from the macho spirit of weight lifting. Also, the movement is a bit too smooth, removing all the coordination and extra muscle usage associated with lifting free weights.


The power cage: A power cage is a large steel frame with a series of stanchions affixed to the sides. You stand in the center of the cage and place your bar on the stanchions that are at the right height for your lift. A power cage doesn’t offer as much safety as a Smith machine because after you lift the bar from the stanchions, you’re on your own. Still, the cage does offer an extra measure of protection during heavy lifts or lifts that require a lot of balance. And if your muscles give out, the stanchions catch the weight before it crashes to the floor.

Understanding cable machines

Not all machines use a cam. A class of equipment called cable machines uses a typical round pulley. A cable machine is a vertical metal beam, called a tower, with a pulley attached. You can adjust the height of the pulley to move it close to the floor, up over your head, or anywhere in between. Some cable machines have two towers. Cable machines are more versatile than Nautilus-type machines. Clip a new handle onto the pulley and you instantly create a new exercise. Consider the triceps pushdown, . Pressing down with a rope feels considerably different from pressing down with a V-shaped bar. You may prefer one attachment to the other, or you may want to use both for variety. See the sidebar “Coming to grips with cable attachments,” in this chapter for a rundown of the most popular attachments..

Understanding electronic weight machines

These high-tech contraptions may be the future of weight machines. Some varieties have computers built right in. You swipe an ID card into the machine, which automatically sets the resistance based on your last workout. As you do your set, the machine sends you technique tips. Other electronic systems attach to regular weight training machines. You punch in a code and the machine retrieves your personal information. The advantage of electronic machines is the storing of your information. This feature is great for beginners, who may be too overwhelmed to remember how much they lifted last time. These systems also run a variety of extensive reports so you can analyze your training in depth.

For instance, you can compare your progress on the leg press to your progress on the leg extension. Serious athletes may find this information useful. However, what’s new isn’t always better. Electronic machines slow down the pace of the gym and remove some of the human element involved in working out. Instead of interacting with the staff and other members, you interact with a machine. Also, if the system goes down, the repair process generally takes longer than it does with your basic weight-stack machine. And, the electronic systems aren’t connected with free weights, so computer-dependent lifters may be discouraged from experimenting with dumbbells and barbells.

Friday, March 14, 2008

What is hydraulic and air pressure machines?

This machine category doesn’t have a weight stack either. Hydraulic and air pressure machines have a series of pistons that create resistance by pumping oil, gas, or fluid. These machines are fine — some are very well designed —but some exercisers don’t feel motivated when they use them because a weight stack isn’t moving up and down or steel isn’t clanging. (Some people have quirks about working out.) All you hear is a sound that’s similar to a can of hair spray in action. Gyms that offer 30-minute circuit programs often use these machines.

What is plate-loaded machines?


Plate-loaded machines fuse traditional machines and free weights. They have a large frame and protect you from dropping any weight on the floor, but they aren’t attached to a stack of weight plates; instead, you place any number of round weight plates onto large pegs.
Some of these plate-loaded machines are gimmicky. They offer no benefits over traditional machines — unless you happen to enjoy carrying weight plates around the gym. However, we do like the plate-loaded machines that let you work each side of your body separately. We also like the varieties that have “free-floating” levers. Instead of forcing you to move through a fixed pathway, the machines let you move any way you want. These machines mimic the feel of free weights (for the most part) while retaining most of the safety benefits of a weight machine.

What is a weight-stack machines?


Traditional weight machines have a stack of rectangular weight plates, each weighing 5 to 20 pounds. Each plate has a hole in it; to lift 50 pounds, you stick a metal pin in the hole of the weight plate marked 50. When you perform the exercise — by pushing or pulling on a set of handles or levers — the machine picks up the plate marked 50, plus all the plates above it. Weight-stack machines save time because changing the amount of weight you’re lifting is easier.

Tuesday, March 11, 2008

How to make weight machines work for you?

Like every machine ever invented, from the Cuisinart to the calculator, weight machines provide advantages over the low-tech contraptions that came before. Here are some of the ways that weight machines can top dumbbells and barbells:
  • Weight machines are safe. Your movement range is limited and the intended pattern is preset, so you need less instruction and supervision than you do with free weights.
  • Weight machines are easy to use. Machines don’t require much balance or coordination, so you can get the hang of an exercise more quickly. Also, you’re more likely to use proper form because the machine provides so much guidance. Machines don’t guarantee good form. You can still butcher an exercise on a machine, which can lead to injury or at the very least cheat your muscles out of a good workout.
  • Weight machines enable you to isolate a muscle group. In other words, machines enable you to hone in on one muscle group to the exclusion of all others. For example, very few free weight exercises isolate your hamstrings (your rear thigh muscles). Usually, you can’t exclude other muscles — such as your front thighs, butt, or lower back — from getting involved. On the other hand, numerous machines can isolate your hamstrings. This feature of weight machines is helpful if you have a particular weakness or are trying to build up one body part.
  • Weight machines help you move through your workout in minutes. You put in the pin, do the exercise, and then move to the next machine. This process also makes working out with a friend, who is stronger or weaker, easier — you don’t have to load or unload weight plates off a bar. But keep in mind that you do need to adjust each machine to fit your body. Weight machines challenge your muscles throughout the entire motion of an exercise. Many (although not all) modern-day weight machines compensate for the fact that your muscles aren’t equally strong throughout a particular motion. Consider the triceps kickback exercise. This exercise is relatively easy at the start, but by the time your arm is halfway straightened out, your muscle is being challenged a lot more. By the end, your triceps again have better leverage, so you finish feeling strong.
Use a kidney-shaped gizmo called a cam to manipulate the resistance at various points throughout your exercise. When you’re at a weak point during the exercise, the cam lightens the load. When your muscle has good mechanical advantage, the cam gives it more work to do. This way, your muscles are working to their fullest throughout the motion. Otherwise, you’re limited to a weight you can move only at your weakest point, as you are with free weights.

Weight lifting accessories

People carry a variety of items in their gym bags. Even if you never set foot in a health club, these weight lifting accessories can make your workouts more comfortable and safe.
  • Belts: The controversy in the fitness community rages on: to wear a belt or not to wear a belt? Proponents of weight lifting belts maintain that belts protect your lower back. Opponents counter that a belt is like a crutch: If the belt does all the work to keep your body stable, then your abdominal and back muscles won’t develop to their fullest potential, and you may end up with back problems down the line. Who’s right? We don’t know. But we’re not fond of belts. Although many casual lifters swear by them, you don’t need a belt unless you’re a serious powerlifter. Your abdominal and lower-back muscles benefit from the work they do to support you during a lift.
  • Clothing: Suzanne made the mistake of wearing running shorts to her first weight li fting session. The error became apparent when the trainer told her to hop on the outer-thigh machine, which required spreading her legs. The lesson: Wear tight shorts (or at least long ones.) On your top, wear a T-shirt or tank top. Forget the multilayered, northern Alaska look, and certainly don’t wear one of those vinyl exercise suits. Heavy clothing only traps your sweat and leads to dehydration; layers can also impede your movement and hide mistakes in your posture that you’d be able to see if you weren’t overly dressed.
  • Gloves: Weight lifting gloves have padded palms, and the tops of the fingers are cut off. Gloves prevent your hands from callusing and slipping off a bar. Wearing hand protection also increases comfort when working with bands or tubing and if you have latex allergies, gloves keep your hands from breaking out. One alternative to gloves that you may want to use is weight lifting pads — spongy rubber squares or circles (like potholders) that you place in the palm of your hands while you lift. Pads can offer better control than gloves because more of your hand is in contact with the weight. However, lifting pads aren’t as convenient as gloves because you have to carry them around as you work out. (Some pads come with clips so you can hook them to your shorts.)
  • Shoes:Wear athletic shoes that have plenty of cushioning and ankle support to protect your feet, your joints, and your balance. On occasion, we see people wearing flip-flops or loafers when they lift weights. If you drop a weight when you’re wearing sandals, your toes have no protection. And if you wear shoes without rubber soles, your footing won’t be secure enough. Some gyms also have policies that prohibit you from training in inappropriate shoes, because it is — an accident waiting to happen.
  • Towel: Do you want to lie down in a pool of someone else’s sweat? We didn’t think so. Be courteous. Use a towel frequently to wipe off your body and the equipment you use.
  • Water bottle: Every gym has a drinking fountain, but you’ll drink more water while weight lifting if you have a bottle by your side. If you exercise at home, a water bottle is a must.
  • Weight training log: Recording your workouts in a journal keeps you motivated and helps you assess your fitness goals.

Understanding Weight Bench

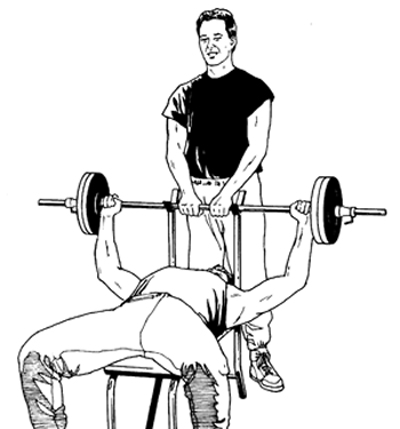
A weight bench is what you may expect: a sturdy, padded bench that you lie, sit, or kneel on to lift weights. To get the most out of free weights, benches are a must.
Sure, you could lie on the ground and lift free weights, but many exercises come to an abrupt halt when your elbows smack against the floor. As a result, your muscles won’t get a chance to work to their fullest through a full range of motion. (Your elbows may not feel so great, either.) Benches come in a variety of designs. While weight benches come in four different varieties, some benches adjust to serve all four functions.
  • Flat: A flat bench looks like a long, narrow piano bench, only with padding and metal legs.
  • Vertical: A vertical bench looks like a formal chair — with the seat back straight up. You wouldn’t want to sit in one of these at the dinner table, but they’re quite comfortable for weight lifting. The back support prevents you from straining your lower back muscles during exercises that you perform while sitting up. The dumbbell shoulder pressuses this type of bench.
  • Incline: The seat back of an incline bench adjusts so you can lie flat, sit up straight, or position yourself at any angle in between. (The angle you choose determines which muscles are emphasized.)
  • Decline: A decline bench slopes downward so you’re lying with your legs higher than your head. Weight lifters primarily use a decline bench to strengthen the lower portion of the chest muscles. Most lifters don’t do much decline work because getting in and out of the position is awkward, especially when you’re holding weights. Keep in mind that you should always use a spotter if you feel that you need extra assistance.

Thursday, March 6, 2008

How to choose barbell bars?

Like dumbbells, barbells, also called bars, come in a variety of designs. The most popular model is a straight bar. At most gyms, these bars weigh 45 pounds and are 6 or 7 feet long. (However, many gyms have bars in a variety of weights, sometimes as light as 15 or 20 pounds. If you’re not sure how much a bar weighs, be sure to check with a staff member.) If you want to lift more than 45 pounds, as most people eventually do, you choose from an array of round plates weighing 11⁄4 to 45 pounds and slide them on either end of the bar.

(The plates have a hole in the center.) For example, if you want to lift 75 pounds, you slide a 10-pound plate and a 5-pound plate on each end of the bar. Some plates have additional holes cut in either side to make them easier to pick up and carry; the holes function like built-in luggage handles. These plates are a brilliant invention and have probably helped prevent many accidents and backaches.

Be sure to use collars at the gym and at home. Collars, cliplike or screwlike devices, temporarily secure weight plates on the bars. The collars prevent the plates from rattling around or sliding off the bar as you push or pull the barbell. Mirrors have shattered from runaway weight plates. Some health clubs require that you use collars. In addition to straight bars, most health clubs and equipment dealers have a number of exotic-looking bars with various twists and bends in them.

The most common is a W-shaped bar about 3 feet long called the EZ-Curl, which is designed to make certain triceps exercises more comfortable. Some gyms and equipment stores also have an array of straight and EZ-Curl bars with weight plates welded to the ends. These barbells are convenient to use because you don’t have to slide weight plates on and off. If you want to switch from 75 pounds to 85 pounds, you simply put the 75-pounder back on the rack and pick up the 85-pounder. No muss, no fuss. These welded bars are often shorter and less bulky than the traditional bars, so they’re more comfortable for many arm and shoulder exercises.

However, you typically won’t find these fixed-weight barbells weighing more than 150 pounds. For many barbell exercises — particularly certain chest and leg exercises — you may need a lot more weight than 150 pounds. With traditional bars, you can pile on up to 600 pounds (not that we expect you to do this right away). Some dumbbell exercises just don’t feel as good as when you use barbells. Any seasoned lifter can tell you that nothing is quite like doing the bench press —the quintessential meat-and-potatoes chest exercise. Many lifters gain a great sense of satisfaction from being able to press so much weight. Even though the dumbbell chest press is a perfectly good exercise, it may not deliver quite the same amount of satisfaction (probably because you can’t lift as much total weight).

For example, if you can do the dumbbell chest press with a 20-pound dumbbell in each hand, chances are good that you can lift at least a 60-pound barbell because your weaker side always limits you, and it’s more difficult to coordinate moving two separate units, instead of one single barbell.

Choosing dumbbells

Dumbbells come in pairs, and at most health clubs, they’re lined up on a rack from lightest (as light as 1 pound) to heaviest (upward of 180 pounds). By the way, the super heavy dumbbells are mostly for show, considering that about .0000001 percent of the population is capable of lifting them. Dumbbells come in many shapes and materials. Some have hexagonal ends so they don’t roll around the floor. Others have contoured handles so they fit more comfortably in your hand. Dumbbells are made of shiny chrome and gray steel. Others have rubber coating, so if some yahoo drops them, the weights won’t dig a hole in the floor the size of Australia.

Dumbbells allow each arm to work independently. If one side of your body is stronger than the other — a common phenomenon — this imbalance is apparent when you’re working with dumbbells. Your weaker arm may start wobbling or may poop out sooner than your dominant arm. Using dumbbells helps correct strength imbalances because each side of your body is forced to carry its own weight, so to speak. By contrast, if you use a bar, your stronger side may simply pick up the slack for your weaker side.

Several good reasons to use dumbbells and barbells

A friend of ours was lying on a weight bench holding two dumbbells over his head when his cat hopped on the bench. While trying to shoo the cat away by squirming around, our friend kept the weights overhead for so long that he tore a rotator cuff muscle. The point of this story isn’t to scare you away from using free weights. In fact, the best approach to strength training combines free weights and machines. Just know that barbells and dumbbells require plenty of concentration. If you follow the safety tips free weight training is perfectly safe. Here are several good reasons to use dumbbells and barbells:
  • Free weights are versatile. With barbells and dumbbells, you can do literally hundreds of exercises that work virtually every muscle group in your body. Most weight machines, on the other hand, are designed to perform only one or two exercises.
  • Free weights give your muscles more freedom to move. Suppose that you’re lying on a bench pushing a barbell above your chest. You can press the weight straight up over your chest, or you can move your arms a few inches back so you’re pressing directly above your neck. Or you can position your arms anywhere between. All these movements are perfectly legitimate ways of doing the exercise and working your pecs, and some motions may feel more comfortable to your body than others.
  • Free weights involve several muscle groups at once. For example, chest press movements work your chest, shoulders, and triceps. However, when you perform these movements with a barbell, you also call on your abdominal and lower back muscles to keep your body still and to keep the bar balanced as you press the weight up. With the equivalent weight machine, you don’t have to worry about holding the bar still, so your abdominal and back muscles don’t get much work.

Sunday, March 2, 2008

Understanding Weight Training Equipment

The most intimidating thing about weight training is the equipment. You can examine a weight machine for half an hour —looking it up and down, walking circles around it, touching it, prodding it, even reading the instructional plaque posted on the frame — and still have absolutely no clue where to sit, which lever to push, or what possible benefit you derive from using it. Heck, even a simple metal bar sitting on a rack can leave you scratching your head.
Handling the bewildering nature of weight equipment consists of two points.
  • First, relax. With a bit of practice, weight training contraptions are actually easy to operate.
  • Second, be happy that you decided to take up weight lifting in the 21st century. Back in the 1800s, fitness enthusiasts lifted furniture, boulders —even cows! Although we personally have never tried hoisting farm animals over our heads, we feel confident that today’s weight training devices are a major improvement.
In this chapter, you discover the basic strength-building tools found in health clubs and home equipment stores. You also receive a detailed account of the pros and cons of each equipment category:
  • Free weights (dumbbells and barbells)
  • Machines
  • Rubber exercise bands and tubes
And, with a little guidance, you decide which type of equipment is right for you. This chapter also reveals the answers to the big questions:
  • Should beginners stick to machines?
  • Do barbells build bigger muscles?
  • Can you get strong without using any equipment at all?

How to Analyze your workout log?

Your journal gives you positive reinforcement no matter how often you choose to record your information. Watching your progress over time also gives you a big boost. If two months ago you could barely eke out 10 repetitions with 30 pounds on the leg extension machine and now you can easily perform 10 reps with 50 pounds, you know you’ve accomplished something. Not only does a diary keep you motivated, but also recording your workouts helps achieve better results. If you’re dedicating plenty of time to your weight training but aren’t getting stronger or more toned, your workout diary may offer clues as to why you’re not seeing results. Scrutinize your diary and ask yourself the following questions:
  • Am I getting enough rest? Maybe you’ve been lifting weights every other day, but your body actually needs two rest days between workouts. An extra day of rest may give you more oomph when you lift.
  • Am I working each muscle group hard enough? Your log may indicate that you’ve been neglecting a particular muscle group. Maybe you’re averaging only four sets per workout for your legs compared to six or seven sets for your other body parts. Perhaps that’s the reason your leg strength seems to be lagging.
  • Am I getting enough variety in my workout? When you flip through your diary, maybe you see the words biceps curl three times a week for the past three months, but you rarely see any other arm exercise. Maybe you’ve fallen into a rut. Add new exercises or vary the number of sets and repetitions you’ve been doing. Or mix up the order of your exercises.
  • Am I lifting enough weight? Maybe you never write down the words “tough workout.” Perhaps picking up the 10-pound dumbbells for your biceps curls has become such a habit that you forgot to notice that those 10-pounders now feel light.
  • Am I doing my cardiovascular exercise before my weights or after? Maybe you’ve been stairclimbing for 30 minutes before your weight sessions — and, therefore, are pooped out before you even lift a single weight.

How to Record information in your log?

Some people benefit so much from recording their weight routines (and cardiovascular workouts) that they jot down information daily. Other people find the paperwork annoying and prefer to keep a log for, say, one week every couple of months as a reality check. No matter how often you use your log, jotting down many or all the following details is a good idea:
  • Your goals: At the start of each week, jot down specific workout goals such as, “Push extra hard on back and biceps,” or “complete eight push-ups.”
  • The name of each exercise: We’re talking specifics. Don’t just write “chest”; write “incline chest fly” or “vertical chest press.” This way, you know whether you’re getting enough variety. Plus, you’re forced to know the name of each exercise. We know people who’ve worked out for years and still refer to the dumbbell shoulder press as “that one where you push the dumbbells up.”
  • Sets, reps, and weight: Note how many repetitions you performed and how much weight you lifted for each set. Suppose that you did three sets of leg curls — first 12 reps with 30 pounds, and then 10 reps with 40 pounds, and then 7 reps with 50 pounds. You can note this by writing “3” in the set column, “12, 10, 7” in the reps column, and “30, 40, 50” in the weight column.
  • How you’re feeling: We’re not asking you to pour out your emotions like a guest on Oprah. Just jot down a few words about whether you felt energetic, tired, motivated, and so on. Did you take it easy, or did you act as if you were in Basic Training?
  • Your cardio routine: Record how much cardiovascular exercise you did — whether it was a half an hour walking on the treadmill at 4 miles per hour or 15 minutes on the stairclimber at level 6. Also, note whether you did your cardio workout before or after you lifted weights.
  • Your flexibility routine: Record the amount of stretching time and how your stretches felt. If you’re feeling ambitious, you can record the names of the stretches or come up with names for your standard stretching routines.