Thursday, December 31, 2009

Work Out with Lower Body Muscles

Here are some tips for working specific lower body muscle groups:
  • Glutes: It’s tough to isolate your butt muscles because nearly every butt exercise also involves the front and/or rear thigh muscles. However, you can maximize the emphasis on your maximus with a few simple technique tricks. For instance, when you’re doing the leg press or the squat, keep your toes pointed straight ahead as much as possible and your weight shifted slightly back onto your heels, especially as you press back up into the straight-leg position. The more weight you shift onto your toes, the more your quadriceps become involved. Also, when you stand up, squeeze your cheeks to make sure your glutes are really working and aren’t just going along for the ride.
  • Quadriceps: The leg extension — an exercise in which you straighten your legs from a bent position — may give you a twinge of pain in your kneecap as you near the fully extended position. In this case, stop just before your legs are straight. Many leg extension machines have a device that stops the lever of the machine from going past the point you set. The machine may also let you start from a higher position than normal if you feel pain when you’re initiating the movement.
  • Hamstrings: The most popular way to work the hamstrings is with a leg curl machine; you start with your legs straight and curl your heels toward your butt. You typically find this machine in three varieties: lying, seated, and standing. In this chapter we show you how to use the lying leg curl because it’s the one you see most often and the one we generally like best (although our opinions vary from brand to brand). With some leg curl machines, you lie flat on your stomach; others have a severe bend in the support pad. Our favorite variety has you lying at an angle with your hips above your head. Try all the hamstring machines available to you, and use any of the machines that feel comfortable.
  • Calves: When you perform the standing calf raise, experiment with the angle of your toes to find the position that’s most comfortable. But don’t angle your toes too much outward or inward or you’ll place too much stress on your knees and ankles. And perform calf exercises slowly. Bouncing your heels up and down causes your calf muscles to tighten and uses momentum to power the movement instead of maximally challenging your muscles.
Expect to feel sore and walk a little stiffly for a day or two after your first few lower body workouts. Of course, any muscle that’s new to weight training is likely to be sore after the first few sessions, but leg muscles seem particularly prone to this phenomenon. Start out with just your own body weight or light weights; otherwise, you may find yourself walking like Herman Munster or wincing in agony when you get up from the breakfast table.

Getting a Great Lower Body Workout


In general, work your large muscles before moving on to your small ones. So perform your lower body workouts in the following order:
1. Glutes
2. Quads
3. Hamstrings
4. Inner and outer thighs
5. Calves
6. Shins

The only exception to this rule is if you specifically want to target a smaller muscle that’s lagging far behind in its strength and is creating a too noticeable weak link. If that’s the case, it’s a good idea to switch your exercise order around so you target the weakest muscle when it’s fresh. Do at least four or five lower body exercises on a regular basis for balanced muscle development and visible training results. Your workouts need to include two types of exercises:
  • Compound exercises, which involve several muscle groups at once
  • Isolation exercises, which hone in on a single muscle group
If you’re starting out with bad knees or hips, you may want to take a few weeks to simply focus on the muscles surrounding those joints. If your knees are the problem, for example, start with exercises that isolate your quads (the thigh squeeze and the leg extension machine) and your hams (the leg curl machine) and wait a few weeks before graduating to compound exercises (the squat and the lunge).

Getting a leg up on the competition


If you’re on an aerobic mission like training for a 10K or a bike-a-thon, strong legs are even more essential. Many runners and cyclists are afraid to lift weights, figuring that they’ll develop bulky legs that’ll slow them down. But the reality, according to mounds of research, is that leg and butt exercises help you go farther and faster. The key is in maintaining a good balance between strength and endurance training. One guy we know couldn’t break the four-hour barrier in the marathon until he started doing lower body weight training exercises. His hips used to tire out at around mile 16, so he wasn’t able to stretch his legs out to their full stride, and he’d shuffle through the last 10 miles. At age 49, thanks to a regular leg routine, he was finally able to cruise through the finish line in 3 hours and 50 minutes. Even if your athletic goals aren’t as ambitious as running 26.2 miles, leg workouts are important. Say you simply want to ride your stationary bike for 30 minutes three times a week. Stronger legs help you pedal faster and harder so that you can burn more calories during that half hour.

Monday, November 30, 2009

Enjoying a Strong Lower Body


According to research, the key predictor of whether you’ll need to live in an assisted living facility when you’re elderly is your leg strength. Here’s why you need to work on those glutes, quads, hams, and calves:
  • Real-life benefits: When you take the time to strengthen your legs, you have more stamina for waiting in line at the post office, racing through the grocery store to catch a small child, climbing office stairs when the elevator is broken, and standing on tiptoe to paint the corner of your ceiling.
  • Injury prevention: Strengthening your lower body muscles is a good way to preserve your hip, knee, and ankle joints — three joints that put in a lot of overtime and are particularly susceptible to injury. It’s true that many joint injuries result from torn ligaments or tendons (the connective tissue that holds your bones in place), but many of these injuries won’t occur in the first place if you have a strong army of muscles surrounding and protecting your joints. Often, lower body injuries result from a lifetime of repetitive motions such as walking up and down stairs. Weak muscles allow the bones to grind down the protective cartilage more rapidly and can’t support the proper alignment that is necessary for healthy joint function. By strengthening the muscles that surround the joints, you give them the support they need to do their job day after day. With strong lower body muscles you’re less likely to sprain your ankle by stepping off a curb because your joints have the strength to hold up even when they’re wrenched into positions they’d prefer to avoid. If you’re already at the point where you have bad knees or a “trick ankle,” it’s not too late to pump some iron with your lower body muscles.
  • The “Feel Good” factor: When your lower body is strong, you feel confident because you know that you can lift that heavy item, you can walk up those stairs, and you can take care of yourself. Leg strength is the leading indicator of who will end up living in nursing homes. Be strong and feel good about you.

Understanding Butt and Leg Muscle Basics


You have several muscles that make up the lower portion of your body. Each muscle serves a purpose and works with the other muscles in your lower body to help you move around. Take a look at the breakdown of the muscles below your waist:
  • Gluteus maximus (glutes): The glutes is the granddaddy of all muscles in your body and covers your entire butt — both cheeks. The gluteus maximus straightens your legs from your hips when you stand up and propels you forward when you walk or run.
  • Hip flexors: The muscles opposite your gluteus maximus, located at the front of your hips. Your hip flexor muscles help you lift your leg up high so you can march in a parade or step up onto a ladder. You don’t need to spend much time working your hip flexors; they tend to be relatively stronger than the glutes in most people. When the hip flexors become disproportionately strong and tight compared to other muscles, they pull your pelvis forward and throw your hip and lower spine into an excessively arched position. This strength imbalance may contribute to poor posture and lower back pain. Keep in mind that balanced muscle development is as important as strong muscles.
  • Abductors: The sides, or meat, of your hips: your outer thighs. Your outer hips move your leg away from your body, like when you push off while ice-skating. The main outer hip muscle is called the gluteus medius.Adductors: The muscles that span the inside of your upper leg or inner thighs. They pull your leg in toward the center of your body or, when they’re feeling ambitious, they sweep one leg in front of and past the other, like when you kick a soccer ball off to the side.
  • Quadriceps (quads): The quads are located at the front of your thighs. Together these four muscles have one purpose: to straighten your leg from the knee.
  • Hamstrings (hams): These muscles reside directly behind your thighbone. They bend your knee, bringing your heel toward your buttocks, and help the glutes do their thing.
  • Gastrocnemius (gastroc): The gastroc is shaped like a diamond. The gastroc allows you to rise up on your tiptoes to see over your neighbor’s fence. Check out the calves of any competitive bicyclist, and you’ll see precisely what this muscle looks like.
  • Soleus: Your soleus lies directly underneath the gastroc and helps out the gastroc when your knee is bent and you need to raise your heels up, like when you’re sitting at the movies and you realize that you just stepped in gum.
  • Tibialis anterior: The partner to your calf muscles is your shin muscle, covering the front of your lower leg. Whenever you’re listening to music that makes you feel like tapping your toes, you can thank this muscle for allowing you to literally make this movement happen.

Saturday, October 31, 2009

Roll down negative curl

The roll down negative curl focuses on the hardest part of the crunch — the lowering phase.
Pay special attention to your form if you have lower back or neck problems.

Getting set
Sit with your knees bent and feet flat on the floor hip-width apart. Reach forward and place your hands on the outside of your thighs. Slide your shoulders down and tilt your chin slightly so there’s a few inches of space between your chin and your chest. Gently pull your abdominals inward. See photo A.

The exercise
Tuck your pelvis and slowly lower back as far as you can go and keep your feet on the ground. Hold for a moment and then curl slowly back up. See photo B.

Do’s and don’ts
  • DO keep your abdominals pulled in so that you feel more tension in your abs.
  • DO curl as well as lift. For an explanation of curling., in which you find out common crunch mistakes.
  • DON’T hunch or collapse your shoulders.
Other options
Hands on chest negative curl (harder): Fold your arms across your chest,
palms down and tuck your chin in slightly. This position increases the weight of your upper body.
Hands behind head negative curl (harder): Place your hands behind your
head without lacing your fingers. This version further increases the weight of your upper body.

Bent knee side crunch

The bent knee side crunch challenges your obliques to work together with all of your abdominal muscles.

Getting set
Lie on your back with your knees bent and your feet hip-width apart and flat on the floor. Drop both of your knees to one side and keep your legs stacked together. Place both hands behind your head without lacing your fingers. Place thumbs at base of skull. See photo A.

The exercise
Curl straight upward keeping your legs together and drawing your ribs toward your hips. Lower back down. Do all the repetitions on one side and then switch to the other side. See photo B.

Do’s and don’ts
  • DO keep torso rotated at the waist and legs together.
  • DO keep your head, neck, and shoulders relaxed.
  • DO move slowly and take the time to feel your abs working.
  • DON’T pull on your neck or touch your elbow to your knee.
Other options
Weighted bent knee side crunch (harder): Hold a lightweight plate or dumbbell
on your chest, or for an even greater challenge, hold a weight on top of or behind your head. Just don’t press the plate down too hard.

Oblique abdominal crunch

The oblique crunch works all your abdominal muscles with an emphasis on your obliques.
Pay special attention to form if you have a history of lower back or neck discomfort.

Getting set
Lie on your back with your knees bent and your feet hip-width apart and flat
on the floor. Place your left hand behind your head so your thumb is behind
your left ear. Place your right arm along the floor beside you. Bring your
elbow out to the side and round it slightly inward. Tilt your chin so your chin
and your chest are a few inches apart. Pull your abdominals in. See photo A
.

The exercise
As you curl your head, neck, and shoulder blades off the floor, twist your torso to the right, bringing your left shoulder toward your right knee. (Your elbow won’t actually touch your knee.) Lower back down. Do all the repetitions on one side and then switch to the other side. See photo B.

Do’s and don’ts
  • DO concentrate on rotating from your middle instead of simply moving your elbows toward your knees.
  • DO keep both hips squarely on the ground as you twist to protect your lower back.

Other options
  • Legs-up crunch with a twist (harder): Lift your bent knees off the floor and cross one ankle over the other.
  • Straight-arm crunch with a twist (harder): Reach for your opposite knee with your arm straight rather than your elbow bent. Reach past the outside edge of your knee.

Tuesday, September 29, 2009

Reverse abdominal crunch

The reverse crunch emphasizes the lower portion of your main abdominal muscles (the rectus abdominis). Use caution if you’re prone to lower back discomfort.

Getting set
Lie on your back with your legs up, knees slightly bent, and feet in air. Rest your arms on the floor and place your fingertips behind your head. Rest your head on your hands, relax your shoulders, and pull in your abdominals.

The exercise
Lift your butt one or two inches off the floor so your legs lift up and a few inches backward. Hold the position for a moment, and then lower slowly. See photo A.

Do’s and don’ts
  • DO keep your shoulders relaxed and down.
  • DO keep the crunch movement small and precise; you don’t have to lift very high to feel this exercise working.
  • DO use a minimum of leg movement.
  • DON’T thrust or jerk your hips.
  • DON’T involve your upper body at all.
  • DON’T cross your feet at the ankles (see photo B).
  • DON’T roll your hips so your buttocks and back come way off the floor. This type of movement involves your front hip muscles more than your abdominals.

Other options
Modified reverse crunch (easier): Hold onto the back edges of an exercise mat or stable object such as the underside of a couch or stuffed chair to help stabilize your upper body. Perform the reverse crunch.
One-leg reverse crunch (easier): Lift one leg at a time. Bend your other knee so your foot is flat on the floor. Avoid pushing on your foot. Use your abs to lift your hips.
Incline reverse crunch (harder): Place three risers underneath one end of a step bench and one riser underneath the other end. Lie on the step with your head at the higher end of it. Stretch your arms out behind you and hold on to the undercling of the step directly behind your head. Perform a reverse crunch by lifting your hips up. This version of the reverse crunch is more difficult because you’re working against gravity.

Basic abdominal crunch

The basic abdominal crunch is the fundamental abdominal exercise that works all of your abdominal muscles.
Pay special attention to your form if you have lower back or neck problems.

Getting set
Lie on your back with your knees bent and feet flat on the floor hip-width apart. Place your hands at your sides. Keep your head upright and don’t press it into your chest. Gently pull your abdominals inward. See photo A.

The exercise
Curl up and forward so your head, neck, and shoulder blades lift off the floor. Hold for a moment at the top of the movement and then lower slowly back down.

Do’s and don’ts
  • DO keep your abdominals pulled in so you feel more tension in your abs and so you don’t overarch your lower back.
  • DO curl as well as lift. For an explanation of curling, in which you ascertain common crunch mistakes.
  • DON’T pull on your legs with your hands.

Other options
Cross-arm crunch (easier): Fold your arms across your chest, palms down, and tuck your chin so it rests on your hands. This position saves you the effort of having to lift the weight of your arms. Legs-up crunch: Keeping your knees bent, pick your legs off the floor, and cross your ankles.
Weighted crunch (harder): Hold a lightweight plate on your chest, or for an even greater challenge, hold a weight on top of or behind your head. Just don’t press the plate down too hard.

Avoiding Mistakes When Training Your Abdominals


Mistakes are so common with abdominal exercises that the crunch has the dubious honor of qualifying for a spot in as one of the exercises most often performed incorrectly.
Here’s a close look at abdominal training no-nos:
  • Avoid doing neck-ups. In other words, lift from your abs, not your neck; otherwise, you’re asking for neck pain. Your head and neck shouldn’t be involved in abdominal exercises at all — they’re just along for the ride. Place your hands behind your head without lacing your fingers together, slide your shoulders down, and tilt your chin slightly so there’s about a fist’s worth of space between your chin and your chest. Your head and neck need to stay in this position throughout the exercise.
  • Don’t move your elbows. Your elbows have nothing to do with abdominal exercises. After you position your elbows out and slightly rounded inward, leave them there. If you pull your elbows up and in, you’ll end up pulling on your neck.
  • Don’t arch or flatten your back. We frequently remind you to pull your abs in, but always keep a slight gap, the width of a finger or two, between the small of your back and the floor. Avoid squeezing your buttocks and jamming your lower back into the floor.
  • After the lift, don’t forget the curl. The crunch involves more than simply lifting your head, neck, and shoulder blades off the floor; you also need to curl forward, as if you’re doubling over. Imagine how you’d move if you were lying on the floor and someone dropped a weight on your stomach. That’s the movement you’re aiming for here.

Monday, August 31, 2009

Myths of Abdominal Workouts


To design an effective abdominal program, you need to separate the hype from the truth. Forget everything you may have found out from TV infomercials. Here we debunk the remarkably persistent myths about abdominal training.

Myth #1: Abdominal exercises get rid of the blubber around your middle
Reality: Ab exercises can’t help you “go from flab to abs,” as many infomercials claim, because flab and abs are separate entities. Abdominal exercises strengthen and tone your muscles, but these muscles lie underneath the layer of fat on top. Spot reducing through toning exercise is a fantasy. The only way to lose your belly fat is to eat less and exercise more — a strategy that reduces your overall body fat. However, even then you have no guarantee that you will lose the fat from your middle.

Myth #2: Everyone can develop washboard abs if they try hard enough
Reality: Even if you make it your life’s mission to eat a low-fat diet, spend hours a day on the StairMaster, and perform abdominal exercises to utter perfection, you still may not develop that rippled look unless your body is genetically programmed to carry almost no fat in the abdominal area. And very few of us are built that way.

Myth #3: For best results, you should do several hundred repetitions of abdominal exercises
Reality: Treat your abs like any other muscle group; in other words, perform 8 to 15 repetitions per set to fatigue for optimal strength and endurance conditioning. To focus on endurance training for the abs, do more reps — up to 24 — to fatigue. If you can do more than this, you’re either doing the exercise incorrectly or you’re performing an exercise that’s too easy for you. Either way, you’re not doing your abs much good.

Myth #4: You need to work your abs every day
Reality: Again, your abdominals are like every other muscle group. They respond best to hard work followed by a day of rest. Overtraining your abs simply invites neck and lower back problems, not to mention boredom. Strength training for your abs, however, is different from endurance training for the core.

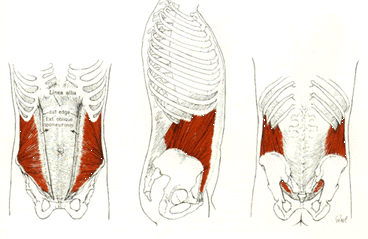
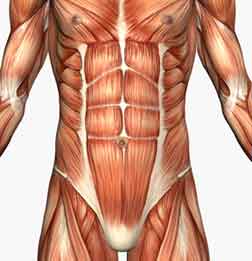
Myth #5: The front of your stomach has two separate muscles: The upper abs and lower abs
Reality: The rectus abdominis is one long, flat, continuous sheet of muscle. Any abdominal crunch exercise works the entire muscle, although lifting your upper body off the floor emphasizes the upper portion of the rectus, and lifting your hips off the floor emphasizes the lower portion. When you do ab exercises slowly and with perfect form, you feel the entire muscle working no matter what exercise you do.

Myth #6: You need a gadget to train your abs
Reality: Although ab roller-type contraptions help novices understand the crunch movement, the floor works as well as or better than any device, and last time we checked, the floor was free. Besides, exercises such as the ones shown in this chapter are more challenging and versatile than those performed with a gadget. We’re not fond of health club abdominal machines, either. Most of them strengthen your back and hips more than they do your abs.

Myth #7: Sit-ups are better than crunches
Reality: With any sit-up-type movement, your abdominals are involved only in the first part of the motion. After your shoulders clear the floor, your hip flexor and lower back muscles take over. So there’s no point in sitting all the way up to your knees.

Enjoying Strong Abdominals


Abdominal exercises won’t eliminate fat around your midsection, but abdominal exercises serve you in many other important ways.
  • Real-life benefits: Your abs play a crucial behind-the-scenes role in your daily life, supporting your spine in all of your movements. For instance, as you’re sitting here reading this book, you probably think your abs have very little to do. In fact, they’re the reason you sit up reasonably straight in your chair, as opposed to oozing off the edge like a blob of Jell-O. Your abs are even more important when you perform more complicated movements. Strong abs enable you to stand in line or shovel dirt in your garden for a lot longer without getting a backache.
  • Injury prevention: Most back pain can be reduced — perhaps even eliminated — by strengthening the abdominal muscles along with the lower back muscles and the buttocks. All of your abdominals work together to support and move your spine. The most common way people injure their back is when they combine bending with rotation, especially during lifting. Strong muscles and proper movement habits prevent this and other injuries.
  • The “Feel Good” factor: The notion of washboard abs creates a great deal of anxiety and insecurity among many individuals. Unless you have the genetics to not store fat above your rectus abdominus muscle, the tone of your abdominals, no matter how fit you are, will show directly under your skin. Models and celebrities often have this fat vacuumed out through liposuction to reveal the muscularity underneath or they have airbrush contour tans sprayed on to give the appearance of ‘cut’ abs. Feel good about yourself from simply knowing that you have strong abdominal muscles, regardless of whether the world can see them or not.

Abdominal Muscle Basics


At this point, every household in America probably knows that the abdominal muscles are collectively referred to as the abs. Keep in mind that your abs aren’t just in front of your body but wrap around your body. This fact is important in training because many people only seem to be concerned with training what they see — the front and center — but your abs cover much more of your body.
You have four abdominal muscles:
  • Rectus abdominis: This is the largest abdominal muscle and runs from your breastbone to your pubic bone, a few inches below your belly button. The rectus abdominis
  1. Curls your spine forward when performing crunches (or when you double over with laughter from watching Desperate Housewives).
  2. Keeps your spine still when you move other parts of your body, such as when you lift a heavy box off the floor.

  • Obliques, internal and external: These muscles run diagonally up and down your sides. Your obliques
  1. Help your rectus abdominis curl your spine forward.
  2. Enable you to twist and bend to the side.
  3. Provide lower back support.

  • Transversus abdominis: The transversus abdominis sits directly beneath the rectus abdominis and is the deepest of all your abdominal muscles. This muscle
  1. Is continuously working when you’re sitting and standing.
  2. Helps support your lower back and keep good posture.

Thursday, July 30, 2009

Wrist curl and reverse wrist curl

The wrist curl and reverse wrist curl are great for strengthening your wrist muscles.
Be careful if you’ve had wrist or elbow problems.

Wrist curl
Hold a weight in your right hand with an underhand grip, and sit on the edge of your bench with your knees as wide as your hips. Lean slightly forward, and place your entire forearm on top of your thigh so your hand hangs over the edge of your knee. Clasp your left palm over your wrist to hold it steady (see photo A). Curl your wrist up so the dumbbell moves toward your forearm, and then lower the weight back down.

Reverse wrist curl
Turn your palm down, and, again, secure your wrist in place with your other hand. Bend your wrist up to raise the dumbbell to thigh height (see photo B), and then lower the weight back down. (Hint: You may need slightly less weight to do the reverse wrist curl.)

Do’s and don’ts
  • DO curl straight up; try to avoid moving the weight to the side.
  • DON’T let your forearm lift off your thigh.
Other options
  • Modified wrist curl: If you have weak wrists and find this exercise difficult, simply move the weight up and down a shorter distance.
  • Wrist-and-finger curl (harder): At the bottom of the wrist curl, roll the weight down to the tips of your fingers and then roll it back before curling the weight up. This exercise is excellent for typists or others who use their hands a lot because it strengthens the forearms and prevents carpal tunnel syndrome.

Triceps dip machine

The triceps dip machine targets your triceps and, to some extent, your shoulder and chest muscles.
Take special care if you have shoulder, elbow, or neck problems.

Getting set
Set the seat height so that when your arms are fully bent, your elbows are at or below chest level. Sit in the seat with your feet flat on the floor. If the machine has a seat belt, wear it to prevent you from popping up out of the seat while you do the exercise. Grasp a handle in each hand so your elbows are bent and your palms are facing in. Pull your abdominals in and sit with your back, buttocks, and shoulder blades against the back support. See photo A.

The exercise
Press the handles down until your arms are straight but your elbows remain relaxed (see photo B). Slowly bend your arms until your elbows are up near chest height.

Do’s and don’ts
  • DO keep your shoulders relaxed instead of hunching them up near your ears.
  • DO keep your wrists in line with your forearm instead of bending them outward.
  • DON’T slam your arms or lock your elbows.

Other options
  • Different grips: Most triceps dip machines have the option of a narrow or a wide grip. Start with the wide grip because you’re more likely to use correct form. However, when you become more proficient with this machine, the inside grip does an excellent job of isolating the triceps muscles.
  • Modified triceps dip machine: You can raise the seat higher to restrict the distance your arms travel. This variation is an excellent option for those with neck and shoulder problems because the raised seat keeps you from raising your arms as high and ensures that the neck and shoulders won’t be hunched and tight.
  • Triceps extension machine: Some gyms have a triceps extension machine rather than a triceps dip machine. The extension machine works the muscles the same way except that you start with your arms at shoulder height with your elbows resting on a pad; then you press the handles, straightening your arms out in front of you instead of downward.

Bench dip

The bench dip is one of the few triceps exercises that strengthens other muscles, too — in this case, the shoulders and chest.
Be careful if you have wrist, elbow, or shoulder problems.

Getting set
Sit on the edge of a bench with your legs together and straight in front of you, pointing your toes upward. Keeping your elbows relaxed, straighten your arms, place your hands so you can grip the underside of the bench on either side of your hips and slide your butt just off the front of the bench so your upper body is pointing straight down (see photo A). Keep your abdominals pulled in and your head centered between your shoulders.

The exercise
Bend your elbows and lower your body in a straight line. When your upper arms are parallel to the floor, push yourself back up. See photo B.

Do’s and don’ts
  • DO try to keep your wrists straight rather than bent backwards.
  • DO keep hips and back (as you lower) as close to the bench throughout the motion.
  • DON’T simply thrust your hips up and down, a common mistake among beginners. Make sure that your elbows are moving.
  • DON’T lower yourself past the point at which your upper arms are parallel to the floor.
Other options
  • Bent-leg bench dip (easier): Instead of extending your legs out in front of you, bend your knees at a right angle so you’re positioned as if you’re sitting in a chair.
  • Feet-up bench dip (harder): Place your feet on another chair of equal height. Or, for an even tougher version, place a weight plate or dumbbell on your lap..

Monday, June 29, 2009

Triceps kickback

The triceps kickback works your triceps. Use caution if you have elbow or lower back problems.

Getting set
Hold a dumbbell in your right hand, and stand next to the long side of your bench. Lean forward at the hips until your upper body is at a 45-degree angle to the floor, and place your free hand on top of the bench for support. Bend your right elbow so your upper arm is parallel to the floor, your forearm is perpendicular to the floor, and your palm faces in (see photo A). Keep your elbow close to your waist. Pull your abdominals in and relax your knees.

The exercise
Keeping your upper arm still, straighten your arm behind you until the end of the dumbbell is pointing down (see photo B). Slowly bend your arm to lower the weight. When you’ve completed the set, repeat the exercise with your left arm.

Do’s and don’ts
  • DO keep your abdominals pulled in and your knees relaxed to protect your lower back.
  • DON’T lock your elbow at the top of the movement; do straighten your arm but keep your elbow relaxed.
  • DON’T allow your upper arm to move or your shoulder to drop below waist level.

Other options
Cable triceps kickback: Put the pulley on the topmost setting and attach a horseshoe handle. Grasping the handle in one hand, position yourself in the same way described in the basic kickback, and perform the same exercise. You may have to step a foot or two away from the cable tower to prevent the cable from going slack.
Triceps kickback with a twist (harder): As you straighten your arm, twist it
so that at the top of the movement, your palm faces up.

Triceps pushdown

The triceps pushdown targets your triceps. Pay special attention to your form if you have elbow problems. Standing up straight with your abdominal muscles pulled in helps you avoid lower back problems.

Getting set
Set the pulley of the cable at the topmost setting and attach a straight or Ushaped bar. Grasp the bar with your palms facing down and your hands about a thumb’s distance from the center of the bar. You can stand either with your feet parallel or with one foot slightly in front of the other. Bend your elbows so your forearms are parallel to the floor and your elbows are alongside your waist (see photo A of Figure 14-6). You can lean slightly forward at the hips, but keep your abdominals pulled in and your knees relaxed. See photo B.

The exercise
Push the bar straight down, keeping your elbows close to your sides (see photo B). Then bend your arms to allow the bar to rise slowly until your arms are slightly above parallel to the ground.

Do’s and don’ts
  • DO push down smoothly, exerting the same amount of pressure with both hands so both sides of the bar travel down evenly. _ DON’T lean too far forward or too heavily on the bar.
  • DON’T allow your elbows to splay out to the sides, especially as you push down.
  • DON’T let your arms fly back up as you return the bar to the starting position. Concentrate on controlling the bar.

Other options

Reverse grip pushdown (easier): Turn your hands around and use an underhanded grip. Because this version allows your biceps to assist your triceps a great deal, it’s less challenging than the basic version.

One-hand triceps pushdown: Attach the horseshoe, and grasp it with one hand in an underhand grip. (You can also use an overhand grip, although it’s tougher.) Place your other hand on your hip. Straighten your arm, pushing the handle until it’s alongside your hip. Then slowly raise the handle back up.

Rope attachment (harder): Use the rope attachment, and move your hands a few inches apart as you press the rope down. You may need to use less weight with the rope than you do with a bar.

Arm curl machine

The arm curl machine focuses on your biceps. Be careful if you’ve had elbow injuries.

Getting set
Adjust the seat so when you sit down and extend your arms straight out,
your arms are level with your shoulders and your elbows are lined up with the moving hinge or pulley of the machine. Sit down and grasp a handle in each hand with an underhand grip. See photo A in Figure

The exercise
Bend your elbows and pull the handles until they’re just above your shoulders (see photo B ), and then slowly lower the handles back down.

Do’s and don’ts
  • DO make sure that you set the seat height correctly. If you set the seat too low, you’ll have trouble bending your arms and may place too much strain on your elbows.
  • DO sit up tall and make an effort to pull exclusively with your arms as opposed to hunching up your shoulders or leaning back.
  • DON’T use a chest pad to help haul the weight. If there’s a pad, use it for light support only.

Other options
Some gyms have arm curl machines that do a fair job of mimicking dumbbell work: The two sides aren’t connected so each arm has to do the work of lifting the weight. This type of machine is a good substitute or supplement for free weight work.

Friday, May 29, 2009

Concentration curl

The concentration curl is especially good for targeting your biceps and excluding all other muscles.
Be careful if you’ve had elbow injuries or are prone to lower back discomfort.

Getting set
Hold a dumbbell in your right hand, and sit on the edge of a bench or a chair with your feet a few inches wider than your hips. Lean forward from your hips, and place your right elbow against the inside of your right thigh, just behind your knee. The weight should hang down near the inside of your ankle. Place your left palm on top of your left thigh. See photo A.

The exercise
Bend your arm and curl the dumbbell almost up to your shoulder (see photo B), and then straighten your arm to lower the weight back down.

Do’s and don’ts
  • DO bend forward from your hips instead of rounding your lower back to lean forward.
  • DON’T lean away from your arm as you lift the weight up to help get better leverage. (Hey, that’s cheating!)

Other options
  • Slant biceps curl: Sit on a bench with the back inclined a few inches. Lean back and curl the weight up. You can do this one hand at a time or with both hands together and with a twist as you curl upward or without a twist.
  • Standing concentration curl: Hold a dumbbell in one hand. Stand alongside a flat bench, lean over, and place your other hand on top of bench. Let the arm holding the weight hang straight down to the floor. Bend your elbow so the weight moves up and in toward your armpit, and then slowly lower it back down.

Dumbbell reverse biceps curl

The dumbbell reverse biceps curl focuses on your biceps. Use caution if you have lower back or elbow problems.

Getting set
Hold a dumbbell in each hand with an overhand grip, and stand with your feet as wide as your hips. Let your arms hang down at your sides with your palms facing toward the back. See photo A. Pull your abdominals in, stand tall, and keep your knees relaxed.
The exercise
Curl your right arm close to your shoulder so your arm faces out away from your shoulder at the top of the movement. Slowly lower the dumbbell back down, and then repeat with your left arm. Continue alternating until you’ve completed the set. See photo B.

Do’s and don’ts
  • DO keep your knees relaxed and your posture tall. This prevents you from swinging your body forward and back to help move the weight.
  • DON’T swing your elbows out wide as you bend your arm to raise the weight. Keep your elbows close to your body without supporting them on the sides of your stomach for leverage.
  • DON’T just let the weight fall back to the starting position. Lower it slowly and with control.

Other options
  • Hammer curl: Instead of beginning with palms facing back, start with palms facing in and keep your palms facing in throughout the motion. Imagine that you’re pounding nails into a board with two large hammers. This version of the exercise puts more emphasis on your forearm muscles, as well as some of the muscles that reside underneath the biceps.
  • Zottman curl (harder): Instead of beginning with palms facing back, begin with palms facing front with an underhand grip. As you curl your arm upward, rotate your palm in toward your body and bring it up and across to the opposite shoulder. This version of the dumbbell curl is slightly harder than the basic version.
  • Seated biceps curl: If you find yourself cheating too much even with light weights, try sitting on a bench or a chair.

Barbell biceps curl

The barbell biceps curl targets your biceps.
Be especially careful if you have elbow problems. Whenever you add weight and bend a joint, it increases the stress to that joint. Therefore, if you have a weakened joint, you need to exercise extreme care not to overdo it and cause an injury. If you have lower back problems, you may want to choose a seated biceps exercise instead.

Getting set
Hold a barbell with an underhand grip and your hands about shoulder-width apart. Stand with your feet as wide as your hips, and let your arms hang down so the bar is in front of your thighs (see photo A of Figure 14-2). Stand up tall with your abdominals pulled in and knees relaxed.

The exercise
Bend your arms to curl the bar almost up to your shoulders , and then slowly lower the bar almost to the starting position.
Do’s and don’ts
  • DO keep your knees relaxed. This protects your lower back.
  • DON’T rock back and forth or lean way back to lift the weight. If you need to do that, you should be arrested for using too much weight.
  • DON’T just straighten your arms and let the bar drop down to your thighs like a sack of rocks. Instead, lower the bar slowly to get the most muscle power from the exercise and to protect your elbows. And don’t lower the bar all the way back down because you lose tension on the muscle.

Other options
  • Reverse-grip biceps curl (harder): Do the basic version of the barbell biceps curl holding the bar with an overhand grip. You feel this exercise more in your wrists. (Hint: Use a lighter weight for this version.)
  • Cable biceps curl: Place the cable on the setting closest to the floor and attach a short or long straight bar. Hold the bar with an underhand grip and stand about a foot away from the cable tower. Curl the weight up and down exactly as in the basic version of the barbell biceps curl.
  • Double biceps curl: Hold a dumbbell in each hand with your palms facing up, elbows resting lightly against your sides, and arms hanging down. Curl the dumbbells up and down together as if they were a barbell.

Wednesday, April 29, 2009

Avoiding Mistakes When Training Your Arms


Some people use such herky-jerky form when they perform arm exercises that they look like people dancing under a strobe light. Keep the following tips in mind when training your arms:
  • Don’t cheat. If you contort your whole body to lift the weight, you work your whole body, not your arms. Rocking back and forth is also a great way to throw out your lower back. Think about how you’ll feel explaining to your friends that you wrenched your back while exercising your arms.
  • Don’t skip your wrists. Few people pine away for forearms the size of Popeye’s.
  • Go easy on the elbows. Exercise captions throughout this chapter tell you to straighten your arms. This, however, doesn’t mean snapping your elbows into a fully straightened position.
  • Keep your elbows still. When your elbows veer out to the side during many biceps and triceps exercises, you’re able to lift more weight. However, this is only because you have more leverage; your arms aren’t getting any stronger. When you’re doing biceps exercises such as the dumbbell reverse biceps curl, you may also have a tendency to pull your arms and elbows forward to lift the weight. You can’t avoid this extra movement completely, but keep it to a minimum.

Enjoying Strong Arms


Because we use our arms so often in daily life, we tend to take our arm muscles for granted. However, giving these muscles extra attention in the weight room really does pay off.
  • Attaining real-life benefits: Your arms are the link between your upper body and the rest of the world. If your arms are weak, your larger, upper body muscles can’t work to full capacity. You’re only as strong as your weakest link. For example, the lat pulldown, a back exercise, mainly requires back strength, but weak biceps limit your ability to do this exercise. With stronger triceps, you can more effectively challenge your chest muscles in exercises such as the push-up or the bench press. Strong wrists are crucial for many weight lifting exercises and for activities outside of the gym: gripping a golf club, shelling peanuts, shuffling cards, or working at your computer keyboard without pain.
  • Preventing injury: Strong arms help protect your elbows from harm. Carry around a heavy briefcase with a straight arm long enough and eventually your elbow starts to ache. With stronger arm muscles, you can haul that briefcase around longer without pain, and you’re less likely to get tennis elbow, which is inflammation of the elbow joint. Powerful arms also minimize your chances of soreness or injuries when you perform weight lifting exercises or when you lift a dumbbell, barbell, or weight plate off of a rack. Strong wrists, in particular, help you avoid carpal tunnel syndrome. Repetitive movements such as typing, scanning items at the grocery checkout, or operating the mouse of your computer can cause this painful and sometimes debilitating condition.
  • The confidence factor: The feel-good factor: We tend to equate toned biceps with masculine strength. Popeye’s biceps are almost the size of his head. In women, the jury is still out. Popular opinion can’t come to a consensus on whether it prefers women with toned arms or weak arms. The bottom line is that strong arms help you to enjoy life better and toned muscles look healthy. Society’s judgment about whether men and women should have big or small muscles is likely to change with the winds of fashion, but being healthy and strong and feeling great are always positive.

Understanding Arm Muscle Basics

Your biceps muscle spans the front of your upper arm. Hang out in any gym and you’ll see people flexing these muscles in the mirror, usually when they think that nobody’s watching. The main job of your biceps (nicknamed your is or your guns) is to bend your arm; in gymspeak, this motion is called curling or flexing.
Your triceps, located directly opposite your biceps, spans the rear of your upper arm. The biceps and triceps, like many muscle groups, work together in pairs. When you squeeze your biceps, your triceps relaxes and your arm bends, and when you squeeze your triceps, your biceps relaxes and your arm straightens. Maintaining a good balance of strength in the relationship between the two muscles is important so that one muscle doesn’t dominate the other. That’s why you need to train both.
Another group of arm muscles allows your wrists to move in a variety of ways. To spare you some jargon, we’re going to refer to these as your wrist muscles. These muscles let you bend your wrist up, arch it down, twirl it in a circle, tilt it left and right, and turn your palm up or down. One of the most important jobs of the wrist muscles is to keep the wrist stable and the wrist joint flat or neutral. If your wrists are weak, the wrist muscles can bend at inopportune times (like when you’re holding a 100-pound barbell over your chest). Weak wrists also mean that you can’t get a grip — on a baseball bat, a stubborn weed, or a can of mushroom soup — and leave you prone to conditions like carpal tunnel syndrome, an inflammation of your wrist nerves.

Monday, March 30, 2009

Shoulder press machine

The shoulder press machine is a good overall shoulder exercise because it challenges all of your shoulder muscles. It also works your triceps and upper back.
Take extra caution if you’re prone to neck, elbow, or lower back problems.

Getting set
Set your seat height so the machine’s pulley is even with the middle of your shoulder. Hold on to each of the front handles. (Your palms face each other.) Pull your abdominals in tight but leave a slight, natural gap between the small of your back and the seat pad. See photo A.

The exercise
Press the handles up without locking your elbows. Lower your arms until your elbows are slightly lower than your shoulders. See photo B.

Do’s and don’ts
  • DO relax your shoulders and keep them well below your ears, especially while your arms are straightened fully.
  • DON’T arch your back or wiggle around in an effort to lift the weight.
  • DON’T thrust upward with more force than necessary; this strain puts a lot of stress on your elbows.
Other options
Many shoulder machines have arms that work “independently” of each other. That is, the left and right sides aren’t connected, so each arm handles its own share of the load. If your gym has this option, we recommend that you give it a try. You’ll get the structure and support that a machine has to offer but also develop balance and uniform strength as you would with free weights.

Internal rotation

Internal rotation also targets your rotator cuff muscles and works your shoulder muscles.
Again, if these movements bother your neck, try resting your head on your outstretched arm.

Getting set
For internal rotation repetitions, switch the weight to your left hand and lie on your back. Bend your elbow so your forearm is perpendicular to the floor and your palm is facing inward.

The exercise
Lower your hand down to the floor as much as your flexibility permits, and then lift back up. Complete an equal number of repetitions with each arm. Figure 13-7 illustrates the internal rotation.

Do’s and don’ts
  • DO imagine that your shoulder is the hinge of a door that’s opening and closing.
  • DO perform the exercise gently and smoothly.
  • DON’T tighten up your neck and face.
  • DON’T throw the weight up.
  • DON’T force the weight farther than your natural flexibility allows.

Other options
Traffic cop (harder): Hold a weight in both hands and stand with your feet as wide as your hips. Bend your elbows and raise your arms up to shoulder height (in the classic stick-em-up position). Keeping your elbows still, rotate your forearms down until your palms are facing behind you and then rotate back up to the start.

External rotation

External rotation focuses on your rotator cuff muscles, but these exercises also work your shoulder muscles.
If these movements bother your neck, try resting your head on your outstretched arm.

Getting set
Holding a dumbbell in your right hand, lie on the floor on your left side. Bend your right elbow to a 90-degree angle and tuck it firmly against your side so your palm faces downward. Pull your abdominals in. Bend your left elbow and rest the side of your head in your left hand or lie on your outstretched left arm.

The exercise
Keeping your right elbow glued to your side, raise your right hand as far as you comfortably can (the distance depends on your flexibility). Slowly lower the weight back toward the floor. Complete an equal number of repetitions with each arm. Figure shows the external rotation.

Do’s and don’ts
  • DO imagine that your shoulder is the hinge of a door that’s opening and closing.
  • DO perform the exercise gently and smoothly.
  • DON’T tighten up your neck and face.
  • DON’T throw the weight up.
  • DON’T force the weight farther than your natural flexibility allows.

Other options
Traffic cop (harder): Hold a weight in both hands and stand with your feet as wide as your hips. Bend your elbows and raise your arms up to shoulder height (in the classic stick-em-up position). Keeping your elbows still, rotate your forearms down until your palms are facing behind you and then rotate back up to the start.

Friday, February 27, 2009

Back delt fly

The back delt fly is an excellent move for strengthening the back of the shoulders and upper back and for improving your posture.

Getting set
Hold a dumbbell in each hand and sit on the edge of a bench. Lean forward from your hips so your upper back is flat and above parallel to the floor (if you can, support your chest against your knees). Let your arms hang down so your palms are facing each other with the weights behind your calves and directly under your knees. Pull your chin back and in and draw your abdominals inward. See photo A.

The exercise
Raise your arms up and out to the sides, bending your elbows a few inches as you go until your elbows are level with your shoulders. Squeeze your shoulder blades together as you lift. Slowly lower your arms back down. See photo B.

Do’s and don’ts
  • DO keep your chin tilted slightly toward your chest throughout the motion so your head and neck don’t drop forward.
  • DO lean forward from your hips instead of rounding your back.
  • DON’T allow the rest of your body to move as you do the exercise.

Other options
  • Back delt row: Use the same starting position except orient your palms backward. As you lift the weights, you need to bend your elbows more than in the basic version.
  • Cable back delt fly: If you have a history of neck pain, try the cable back delt fly version. Set the cable on the setting closest to the floor; hook up a horseshoe handle. Kneel alongside the cable tower and grasp the handle in the hand that’s farthest away from the tower. (The cable passes underneath your body.) Squeeze your shoulder blade and lift your arm up to the side, as in the basic version. Do the same number of reps with each arm.
  • Standing back delt fly: Do the same exercise while standing with your feet placed as wide as your hips. Lean forward so that your torso forms a 45-degree angle with the floor. Keep your abs pulled in to protect your lower back and resist any rocking movement.

Front raise

The front raise isolates the front portion of your shoulder muscles. Use caution if you have a history of lower back or neck discomfort.

Getting set
Hold a dumbbell in each hand and stand up tall with your feet as wide as your hips. Let your arms hang down at your sides — elbows relaxed and palms facing back. Stand up tall, pull your abdominals in, and relax your knees. See photo A.

The exercise
Raise your right arm up to shoulder height and then lower it back down. Then do the same with your left arm. Continue alternating until you complete the set. Or, for more of a challenge, do all your reps with one arm and then the other. See photo B.

Do’s and don’ts
  • DO keep your elbows slightly bent as you perform the exercise.
  • DON’T arch, lean back, or wiggle around in an effort to lift the weight.
  • DON’T lift your arm above shoulder height.

Other options
  • Palms-up front raise: Turn your palm up and do the exercise exactly as it’s described in the basic front raise. Try this version if you’re prone to shoulder or rotator cuff injuries.
  • Diagonal front raise (harder): When the dumbbell is at shoulder height, move your arm a few inches in until the weight is in front of the top of your chest. Skip this version if you have chronic shoulder problems.
  • Seated front raise (harder): Perform the front raise sitting on a bench with a back support; this position removes any possibility of cheating!
  • Lying front raise (harder): Lie on your stomach on a bench holding a dumbbell in each hand, arms straight in front of you (or slightly out to the side), palms facing in and thumbs up. Raise the dumbbells as high as you comfortably can but no higher than shoulder level. You’ll have to use a much lighter weight for this version of the exercise. You can also incline the bench and do the same exercise.

Lateral raise

The lateral raise works the center of your shoulder muscles. Make sure that you use stellar technique if you have neck or lower back problems.

Getting set
Hold a dumbbell in each hand and stand up tall with your feet as wide as your hips. Bend your elbows a little, turn your palms toward each other, and bring the dumbbells together in front of the tops of your thighs. Pull your abdominals in. See photo A .

The exercise
Lift your arms up and out to the side until the dumbbells are just below shoulder height. Slowly lower the weights back down. It may help to imagine that you’re pouring two pitchers of lemonade on the floor in front of you. See photo B.

Do’s and don’ts
  • DO lift from the shoulders; in other words, keep your elbows stationary.
  • DON’T arch your back, lean backward, or rock back and forth to lift the weights.
  • DON’T raise the weights above shoulder height.
Other options
Bent-arm lateral raise (easier): Start with your arms bent at a 90-degree angle, palms facing each other, and the dumbbells in front of your body. Keeping your elbows bent at 90 degrees throughout the motion, lift the weights until your elbows are at shoulder height. The bent-arm lateral raise exercise doesn’t give your shoulders quite as good a workout as the basic version, but if you have weak shoulders or a history of shoulder problems, you can do this modified version of the lateral raise exercise.
Seated lateral raise: For a change of pace, perform the lateral raise exercise sitting on a bench, starting with your arms hanging straight down at your sides, elbows slightly bent.
Thumbs-up lateral raise (easier): Do this movement with your palms facing forward and your thumbs pointing upward. This version places the least stress on your rotator cuff muscles and is often used in physical therapy.

Thursday, January 29, 2009

Dumbbell shoulder press

The dumbbell shoulder press targets the top and center of your shoulder muscles. This exercise also works your upper back and triceps. Use caution if you have lower back, neck, or elbow problems.

Getting set
Hold a dumbbell in each hand and sit on a bench with back support. Plant your feet firmly on the floor about hip-width apart. Bend your elbows and raise your upper arms to shoulder height so the dumbbells are at ear level. Pull your abdominals in so there’s a slight gap between the small of your back and the bench. Place the back of your head against the pad. See photo A.

The exercise
Push the dumbbells up and in until the ends of the dumbbells are nearly touching directly over your head and then lower the dumbbells back to ear level. See photo B.

Do’s and don’ts
  • DO keep your elbows relaxed at the top instead of locking them.
  • DO stop lowering the dumbbells when your elbows are at or slightly below shoulder level.
  • DON’T let your back arch a great degree off the back support.
  • DON’T wiggle or squirm around in an effort to press the weights up.
Other options
Palms-in dumbbell press (easier): Do this exercise with your palms facing each other. This position allows your wrists and biceps muscles to help execute the movement.

Avoiding Mistakes When Training Your Shoulders


For many avid weight lifters, shoulder injuries don’t happen overnight. We know countless people who’ve lifted for years, sometimes ignoring minor shoulder pain, and then — pop! — they’re finished. Kaput. But what they perceive as a sudden injury is actually the result of years of overuse and poor form. Avoid the common mistakes to keep your shoulders strong and healthy.

Exaggerating the movement
If the instructions say lift the dumbbell “to shoulder height,” don’t lift the weight up to the ceiling, because lifting your arm to this unnatural angle adds undue stress to the joint with little advantage for increasing muscle tone. In other words, the risk of injury from lifting higher outweighs any minimal benefit of getting slightly stronger by increasing the size of the movement.

Arching your back
When you perform shoulder exercises while sitting on a vertical bench, make sure that you only have a slight gap between the small of your back and the backrest. Yes, arching your back gives you more leverage to lift heavier weights, but arching also cheats the muscles that you’re targeting and puts your lower back in a vulnerable position — causing injury.

Rocking back and forth
When you perform shoulder exercises while standing, relax your knees and maintain a tall posture. Many people lock their knees and lean back, a posture that your lower back muscles don’t appreciate. If you’re moving any body parts other than your arms, you aren’t targeting your shoulder muscles, and you’re using too much weight.

Performing behind-the-neck shoulder exercises
You’re likely to see lifters press a barbell overhead and then lower it behind the neck rather than in front. Some shoulder machines also involve behindthe-neck movements. Stay away from these exercises! They require a severe backward rotation of your arm, placing your shoulder and rotator cuff muscles in a weakened and precarious position. The movement also compresses the top of your arm bone into your shoulder socket, which tends to grind the bones and place your rotators under a great deal of additional stress. Always keep in mind that the benefit of any exercise should outweigh the risk. Suzanne, who knows better than to perform these exercises, nevertheless did a set of behind-the-neck shoulder presses while training for a weight lifting competition. The next day she couldn’t reach her left arm backward without wincing in agony — nor could she press a measly 5-pound dumbbell overhead without severe pain. Only after seven months of rest and rehab exercises did her rotator cuff injury begin to heal. Suzanne learned her lesson the hard way and now cringes when she sees people at her gym performing the very exercise that ruined her workouts for months.

Getting a Great Shoulder Workout


You can strengthen your shoulder muscles in through four main types of shoulder movements (although dozen of ways exist). Perform the following exercises in the order that they’re listed. In general, you lift the heaviest weights while pressing and the lightest weights while doing back fly movements.
  • Press: Straighten your arms up over your head. Shoulder-press exercises work the entire shoulder muscle.
  • Lateral raise: Raise your arms from your sides out to shoulder level. Lateral raises focus on the top and outside portions of the muscle.
  • Front raise: Raise your arms from your sides directly in front of you. Front raises work the front and top of the deltoid.
  • Back fly: Bend over from the hips as far as your flexibility permits to align your lift against the pull of gravity. Your chest should be as close to parallel to the ground as possible. Raise your arms out to the sides, working the rear and outside portions of the muscle.
From time to time, vary the order of your exercises to target your weaker muscles first and to provide a variety of stimulation for the muscle group to optimize conditioning. You needn’t include all four types of exercises in each shoulder workout, but you should aim to perform each type on a regular basis so you develop evenly balanced shoulder muscles. (Later in this chapter, you find out several variations of each exercise, as well as a few other shoulder movements that don’t fall into these categories.) Perform shoulder exercises with free weights rather than machines. Often, the motion feels unnatural with the machine and places excess strain on the neck. For people of diverse sizes, such as petite women, aligning the machine properly can be hard, especially on a machine that’s designed for a larger man’s body.

Tuesday, January 13, 2009

Enjoying Strong Shoulders


Your shoulders do a fair amount of work whenever you perform back and chest exercises, but performing exercises that single out your delts are also important for the following reasons:
  • Real-life benefits: Strong shoulders make most arm movements easier, whether you’re beaning your brother with a snowball, passing the potatoes across the table, or lifting your “a little too heavy” suitcase. Virtually every upper body exercise involves your shoulder muscles to some extent, so strengthening your shoulders enables you to lift heavier weights on chest and back exercises.
  • Injury prevention: If your shoulders are weak, they’re going to take a beating even if you perform chest and back exercises perfectly. Shoulder exercises also can prevent weekend-warrior type injuries, such as shoulder tears from swinging a sledgehammer, a torn rotator cuff from a softball tournament, or slapping a puck into the garbage can that serves as your hockey goal. If your shoulders are weak, you can even injure yourself while opening a dresser drawer.
  • Self-confidence factor: Open up any bodybuilding magazine and you see headlines such as, “Grow Those Big Caps Even Bigger” or “Delts to Die For.” Bodybuilders take their shoulder training seriously because they know that these muscles play a big part in their appearance, which, after all, is what bodybuilding is all about. Even if you don’t want to build competition-level delts, you can still develop toned, shapely shoulders and reclaim your confidence to wear sleeveless shirts. (Although you should wear sleeveless shirts any time that you please. But a toned shoulder muscle may put a little pep in your sleeveless step.)

Understanding Shoulder Muscle Basics


Your shoulder muscles, officially, are called the deltoids or delts. These muscles rest like a cap on top of the shoulder (the best way to see this is to hold your arm out horizontally). The delts are made up of three sections:
  • Center: The top or medial deltoid is on top of the shoulder. When this muscle contracts, you can lift up your arm.
  • Front: The front or anterior deltoid lies in front. When it contracts, your arm moves inward toward the center front.
  • Back: When the posterior deltoid in the back contracts, your arm moves back to the midline and can even move slightly farther back.
Your shoulder is able to move in so many directions because your shoulder joint is a ball-and-socket joint: The round head of your arm bone snaps neatly into your shoulder socket. Your hip is another ball-and-socket joint, but even that joint doesn’t have the mobility that your shoulder does. The rotator cuff is a group of four muscles that keep your arm from slipping out of its socket. They lie underneath your delts, performing their job in complete anonymity.

Unfortunately, the rotator cuff muscles are so anonymous that many people don’t even know that these muscles exist and, therefore, don’t bother to train them. The only time they seem to get any recognition is when a professional baseball pitcher is sidelined for the season by a rotator cuff injury. Your rotator cuff muscles stabilize your shoulder joint and enable you to twist your arm while your elbow is straight, such as when you turn your palm to face forward and then backward. They also get into the act during throwing and catching motions and when you raise your arms above your head.

Assisted dip

The assisted dip primarily works your chest muscles with a lot of emphasis on your shoulders and triceps, too.
Use caution if you have elbow, shoulder, or lower back problems.

Getting set
For this exercise, deciding which plate to put the pin in can be confusing because you follow the exact opposite rule of every other exercise. In this case, you choose more plates if you want the exercise to be easier and fewer plates if you want the exercise to be harder. The more plates you select, the more your weight is counterbalanced during the exercise. For example, if you weigh 150 pounds and you place the pin in the plate marked 100, you have to lift only 50 pounds of your body weight. But if you put the pin into the plate marked 50, you have to lift 100 pounds.
After you’ve set your weight, step onto the platform of the assisted dip machine, and then carefully kneel on the kneepad or step on the foot bar as required by the machine at your gym. Grip the lower bars with your palms facing inward and straighten your arms. Pull your abdominals in and keep your body tall. See photo A.

The exercise
Lower your body until your upper arms are parallel to the floor and then push back up. See photo B.

Do’s and don’ts
  • DO relax your shoulders so they don’t hunch up by your ears.
  • DO keep your abdominals pulled in so your back doesn’t arch.
  • DO keep your neck aligned with the rest of your spine instead of allowing your chin to jut forward.
  • DON’T explode back to the start and snap your elbows.
  • DON’T lower your body farther than the point at which your upper arms are parallel to the floor.

Other options
  • Traditional dip (harder): Stand facing a dip station, and place your hands on the dip bars. Hop up so your feet are off the floor. Straighten your arms and lift your body upward. Keep your legs straight, or bend your knees slightly and cross one ankle over the other. Remain tall and relaxed with your abdominals pulled inward. Bend your elbows and lower your body only until your upper arms are parallel to the floor. Straighten your arms to lift yourself back up.
  • Negative-only dip (easier): If you find a traditional dip too difficult, perform only the negative phase: Use your muscle power to lower yourself and then jump up to the start after every repetition. However, when you jump up, take it easy on your elbows.
  • Weighted dip (harder): Do the basic version of the exercise with a special waist belt designed to hold a weight plate on the end of it.

Cable crossover

The cable crossover strengthens your chest muscles with emphasis on the shoulders as well.
Be careful if you have shoulder, elbow, or lower back problems.

Getting set
Set the pulleys on both towers of a cable machine to the top position. Clip a horseshoe handle to each pulley. Stand between the towers with your legs comfortably apart and with one foot slightly in front of the other. Grasp a handle in each hand, palms facing down and slightly forward. Tighten your abdominals, lean slightly forward from your hips, and relax your knees. See photo A.

The exercise
Keeping a slight bend in your elbows, pull the handles down so one wrist crosses slightly in front of the other. Then slowly raise your arms up and out to the sides until your hands are level with your shoulders. See photo B.

Do’s and don’ts
  • DO exhale deeply before bringing your hands together.
  • DO initiate the move from your chest; in other words, keep your shoulders, elbows, and wrists in the same position throughout.
  • DON’T forget that slight forward lean: It takes the pressure off your lower back.

Other options
  • Flat bench cable fly: Set the cables to the lowest point on the towers, and place a flat bench in the center of the towers. Grasp a handle in each hand and lie on your back. Straighten your arms up directly over your shoulders and then spread your arms down and to the side until your elbows are just below shoulder level. This motion is the same one used in the flat bench dumbbell chest fly.
  • One-hand crossover: Do the basic cable crossover one arm at a time. Place the unused hand on your hip or hold onto the cable tower.

Vertical chest press machine

The vertical chest press machine focuses on your chest muscles, with additional emphasis on your triceps and shoulders. Most vertical chest machines have more than one grip so that you can work your chest muscles in different ways.
Use caution if you have shoulder or elbow problems.

Getting set
Sit in the machine so the center of your chest lines up with the set of horizontal handlebars. Press down on the foot bar so that the handles move forward. Grip the horizontal handles. Straighten your arms, pushing the handles forward.
Keep your abdominals tight so your upper back remains on the pad.
See photo A.

The exercise
Remove your feet from the foot bar — you’ll feel the weight of the stack transfer into your hands. Slowly bend your arms until your hands are just in front of your chest, and then push the handles forward until your arms are straight. When you’ve completed your set, put your feet back on the foot bar and let go of the handlebars before you lower the weight stack all the way down. See photo B.

Do’s and don’ts
  • DO keep your neck against the backrest.
  • DON’T press so quickly that your elbows snap shut and your shoulders come up off the backrest.

Other options
Different angles: You may find chest machines that position you horizontally and at many angles between horizontal and vertical. Other machines work the left and right sides independently of each other; in other words, the left and right levers of the machine aren’t connected to one another, so when you raise the weight, both sides of your body have to fend for themselves. Machines with independent action are a good alternative for those with leftright muscle imbalances or those who want to combine the safety of using a machine with the feel of using free weights. Try them all for variety to challenge your chest muscles differently.
Vertical grip (harder): Use the vertical handle of your chest machine. This grip factors out a lot of the help you get from your shoulders when using the horizontal grip.