Tuesday, December 30, 2008

Dumbbell chest press

The dumbbell chest press closely mimics the bench press. This exercise works your chest muscles, along with your shoulders and triceps. You may want to modify or avoid this exercise if you have shoulder, elbow, or lower back problems.

Getting set
Lie on the bench with a dumbbell in each hand and your feet flat on the floor (or up on the bench if it’s more comfortable). Push the dumbbells up so your arms are directly over your shoulders and your palms face forward. Pull your abdominals in, but don’t jam your back into the bench; don’t let it arch way up, either. Tilt your chin toward your chest. See photo A. Lower the dumbbells down and a little to the side until your elbows are slightly below your shoulders. Push the weights back up, taking care not to lock your elbows or allow your shoulder blades to rise off the bench. See photo B.

Do’s and don’ts
  • DO allow your lower back to keep its natural arch so you have a slight gap between your lower back and the bench.
  • DON’T contort your body in an effort to lift the weight; lift only as much weight as you can handle while maintaining good form.

Other options
Partial dumbbell press (easier): Lower the weights only about three quarters the distance of the basic version of this exercise. Try this version if you have elbow, shoulder, or rotator cuff problems.

Incline chest press: Perform this exercise on an incline bench, and you use less weight than when you perform a flat-bench press. You’ll challenge the upper fibers of the pecs more.

Decline chest press: Do this exercise on a decline bench, with your head lower than your feet. The hardest part of this version is picking up and releasing the weights. Grab the weights while you’re sitting up, hold them against your chest, and ease yourself into the decline position. When you’re done with the exercise, gently ease the dumbbells off to either side to the floor. (Don’t just drop them.) Better yet, ask someone to hand the weights to you at the start of the exercise and take them away when you’re done.

Bench press

The bench press, crowned the king of all chest exercises by bodybuilders, primarily works your chest muscles, with plenty of emphasis on your shoulders and triceps, too.
You may want to try a modified version of this exercise — or avoid it altogether — if you have lower back, shoulder, or elbow problems.

Getting set
Lie on the bench with your feet flat on the floor or up on the bench if the bench is too tall. Grip the bar so your arms are evenly spaced a few inches wider than shoulder-width apart. Your upper arms should be slightly above parallel to the floor. Tuck your chin toward your chest and pull your abdominals in tight, but don’t force your back into the pad, or overarch it. Lift the bar off the rack and push it directly up over your shoulders, straightening your arms without locking your elbows. See photo A.

The exercise
Lower the bar until your elbows are slightly below your shoulders. The bar may or may not touch your chest — this depends on how long your arms are and how big your chest is. Press the bar back up. See photo B.

Do’s and don’ts
  • DO remember to breathe. Exhale as you press the bar up, and inhale as you lower it.
  • DON’T cheat. In other words, if you have to wiggle around or arch your back in order to hoist the bar, you’re not doing much for your chest, but you’re asking for lower back injuries.
  • DON’T press the bar up too high; keep your elbows relaxed and your shoulder blades on the backrest throughout the exercise.

Other options
Towel chest press (easier): Roll up a large bath towel and place it across your chest. Lower the bar until it touches the towel and then press back up. This variation is good if you have shoulder problems because it reduces the range of motion and lessens the stress on the shoulder joint.

Incline bench press: Incline the bench a few inches and then do the exercise as described above. This version emphasizes the upper fibers of your pecs and shoulders.

Decline bench press: Do this exercise on a decline bench, with your head lower than your feet. This requires a special decline version of the bench press station. Some bench press stations can set flat, incline, or decline, whereas others are fixed permanently in the decline position

Modified push-up

The modified push-up strengthens your chest muscles, with additional emphasis on your shoulders and triceps.
Be extra careful if you have lower back, shoulder, elbow, or wrist problems.

Getting set
Lie on your stomach, and bend your knees. Bend your elbows and place your palms on the floor a bit to the side and in front of your shoulders. Straighten your arms and lift your body so that you’re balanced on your palms and the part of your thighs just above your knees. Tuck your chin a few inches toward your chest so that your forehead faces the floor. Tighten your abdominals. See photo A. Don’t cross your ankles like in photos C and D. Use your inner thigh muscles to keep your legs parallel.

The exercise
Bend your elbows and lower your entire body at once. Instead of trying to touch your chest to the floor, lower only until your upper arms are parallel to the floor. Push back up. See photo B.

Do’s and don’ts
  • DO keep your abdominal muscles pulled in tight throughout the exercise so that your back doesn’t arch like a swaybacked horse; otherwise, you’re begging for a lower back injury.
  • DO bring your arms to a full extension.
  • DON’T lock your elbows at the top of the arm extension.
  • DON’T do the dreaded head bob. That’s when you dip your head toward the floor without moving any other part of your body. Talk about a giant pain in the neck!

Other options
Wall push-up (easier): Stand a few feet away from a wall and place your palms flat on the wall slightly wider than your shoulders. Bend your elbows and lean into the wall. Then press yourself away from the wall by straightening your arms.
Incline push-up: This version is easier than the modified push-up but harder than the wall push-up. Follow the same setup as the basic version of this exercise, but place your hands on top of a step bench that has two or three sets of risers underneath.

Military push-up (harder): Lie facedown with your legs straight out behind you. Bend your elbows and place your palms on the floor a bit to the side and in front of your shoulders. Straighten your arms and lift your body so you’re balanced on your palms and the underside of your toes. Tuck your chin a few inches toward your chest so your forehead faces the floor. Tighten your abdominals. Bend your elbows and lower your entire body at once. Instead of trying to touch your chest to the floor, lower only until your upper arms are parallel to the floor. Push back up.

Negative push-up (easier): This version is harder than the modified push-up but easier than the military push-up. Only perform the lowering phase of the military push-up. Slow the movement down and try to lower yourself in five counts. Lower your knees to the ground and follow the modified version when you push yourself up.

Sunday, December 14, 2008

Avoiding Mistakes When Pumping Your Pecs


One morning Liz was working at a gym when a member came up and casually mentioned that another member needed help on the bench press. Liz strolled over to find this man trapped underneath a bar that apparently had been too heavy for his chest muscles to handle. “Caesar,” she asked, “how long have you been there?”
“About 20 minutes,” he replied.
Why hadn’t he yelled for help? He was too embarrassed. The moral of the story: Safety is more important than lifting heavy weights. In addition to lifting the proper amount of weight, take the following precautions when working your chest:
  • Don’t lock your elbows. In other words, don’t straighten your arms to the point that your elbows snap. This arm extension puts too much pressure on the elbow joints and leads to tendonitis or inflammation of the elbow joint itself. When you straighten your arms, keep your elbows slightly relaxed.
  • Don’t arch your back. In an effort to hoist more poundage, some people arch their backs so severely that there’s enough room between their back and the bench for a Range Rover to drive through. Sooner or later, this position causes a back injury. Plus, you’re doing nothing to strengthen your chest muscles. Instead, you’re overstraining your lower back.
  • Don’t flatten your back. In a sincere effort not to cheat, many people do the exact opposite of overarching their backs — they force their lower backs into the bench. This posture is equally bad for your back. When you lie down, make sure that a slight gap exists between your lower back and the bench, reflecting the natural arch of your lower back.
  • Don’t lift your shoulder blades off the bench or backrest. If you do this, your shoulders bear too much weight — without any support from the bench. This error is subtle but one that may be costly for your shoulder joint.
  • Don’t stretch too far. When you lie on your back and perform the bench press, you may be tempted to lower the bar all the way to your chest. Similarly, when you perform a push-up, you may want to lower your body all the way to the floor. Don’t. Instead, follow the instructions we provide for these and similar chest exercises.

Which chest exercises should you do first?

Experts argue this point, but let personal preference be your guide. Here are our recommendations:
  • Perform free-weight exercises when you’re fresh. These exercises require more concentration, strength, and control.
  • Execute flat-bench exercises before incline or decline exercises. Experiment with the order of exercises for a couple of weeks until you come up with a sequence that works for you.
  • Change the sequence from time to time. Changing it up challenges your muscles differently. If you always do the chest fly before the dumbbell chest press, for example, you may never realize your true dumbbell press potential because your chest muscles are always tired by the time you get to that exercise.
  • Perform 8 to 15 reps.
Determining your one-rep max — that is, the maximum amount of weight you can lift once — is somewhat of an ancient gym tradition with the bench press. Don’t try this until you’ve been lifting weights for a month or two, and don’t attempt to max out more often than once a week. In fact, some experts believe that maxing out once a month brings better results. When you do attempt a maximum weight, make sure that you have a spotter. If you’re going for your one-rep max, do a few warm-up sets, gradually increasing the weight.

Getting a Chest Workout


You can change the feel and focus of many chest exercises by adjusting the angle of the bench you use. Performing chest exercises on a flat bench emphasizes those fibers in the center of your chest. When you adjust the bench a few degrees to an incline position, you shift the focus of the exercise to the fibers in your upper chest and shoulder muscles. Doing the opposite — adjusting the bench to a decline position — concentrates the work on the lower fibers of the chest. By the way, decline exercises are probably the least important category of chest exercises because they work a relatively small portion of the pecs. We won’t be showing you how to operate one popular chest machine: the Pec Deck. You sit with your arms spread apart, each arm bent and placed on a pad. You push the pads toward each other, as if you’re clapping in slow motion. We think the Pec Deck should be renamed the Pec Wreck, or more accurately, the Shoulder Wreck. These machines place an enormous amount of pressure on the shoulder joint and rotator cuff and frequently lead to injury. What’s more, they don’t actually do much for your pec muscles. A safer and more effective alternative to the Pec Deck is the dumbbell chest fly.
Because your chest muscles are among the largest in your upper body, we suggest that you perform more sets of exercises with these muscles than with the smaller muscle groups of your arms. In general, we recommend:
  • Performing 3 to 12 sets of chest exercises per workout. True beginners should start with one set. By the way, when we say 12 sets, we don’t mean a dozen sets of the same exercise; you may want to do 3 or 4 (or more) different exercises. And, if you’re like most people who sit during the day, you need to do more sets of back exercises than chest exercises to address any muscle imbalances and prevent slouching and a collapsed chest.
  • Beginning each exercise with an easy warm-up set. Even powerlifters who bench-press 500 pounds often warm up with a 45-pound bar.

Enjoying Strong Pecs


This may be the first time you’ve given your chest muscles any thought, but you’ve been depending on them your whole life to push things around. Now that you’ll be performing chest exercises, you can be pushier than ever. Here’s how you profit from training your pecs:
  • Real-life benefits: You have more oomph when you push a lawn mower or a full shopping cart with two kids hanging off the end — or when you wrap your arms around Mr. Ted at Thanksgiving after he’s eaten an entire pumpkin pie.
  • Injury prevention: Your chest muscles attach to your shoulder joint. So with strong pecs, you’re less likely to injure your shoulders while rearranging your furniture or pushing your car out of a mudhole.
  • The feel good factor: Chest exercises may make a woman’s breasts appear perkier, although keep in mind that these exercises won’t transform any woman from an AA cup to a DDD cup or vice versa.
As for men:
Pec training makes your chest fuller. However, both sexes need to maintain realistic expectations about chest exercises.

Understanding Chest Muscle

The technical name for chest muscles is the pectorals, but you can shorten the term to pecs. You have two pec muscles:
  • Pectoralis major: The pec major is a skeletal muscle that draws the arm inward and rotates it. This muscle enables you to give hugs. Whenever you pledge allegiance, your hand is covering the meat of the pectoralis major.
  • Pectoralis minor: The pec minor moves the scapula forward and down and also raises the ribs. This muscle resides underneath the pec major. Figure shows the location of your pectorals. With the help of other muscles, such as your shoulder muscles and triceps, your pecs are in charge of a variety of pushing and hugging movements.

Saturday, November 29, 2008

Back extension

The back extension strengthens your lower back muscles. Performing this exercise on a regular basis may help reduce lower back pain. Use caution if you have a history of back problems or if your lower back is bothering you right now.

Getting set
Lie on your stomach with your forehead on the floor, arms straight out in front of you, palms down, and legs straight out behind you. Pull your abs in, as if you’re trying to create a small space between your stomach and the floor.

The exercise
Lift your right arm and left leg a couple of inches off the floor and stretch out as much as you can. Hold this position for five slow counts, lower back down, and then repeat the same move with your left arm and right leg. Continue alternating sides until you’ve completed the set. See Figure.

Do’s and don’ts
  • DO exhale as you lift and inhale as you lower.
  • DO pretend as if you’re trying to touch something with your toes and fingertips that’s just out of reach.
  • DO pay special attention to how your lower back feels.
  • DON’T lift up higher than a few inches.
  • DON’T arch your lower back.

Other options
Sequential back extension (easier): If the basic version of the back extension bothers your lower back, lift and lower your right arm, and then lift and lower your left leg.
Kneeling opposite extension (easier): Kneeling on your hands and knees, extend your right arm out in front of you and your left leg out behind you. This version places less stress on the lower back and is an excellent modification for those new to lower back training and those who feel lower back discomfort when doing back extension exercises.
Same-side back extension (harder): Do the same exercise while lifting your right arm and right leg at the same time.

Pelvic tilt

The pelvic tilt is a subtle move that focuses on your lower back, but also emphasizes your abdominals. This is a good exercise to do if you have a history of lower back problems. The pelvic tilt restores mobility to tight or stiff muscles and it heightens body awareness of the muscles of the lower back. It is also a great warm-up exercise for more strenuous core training.

Getting set
Lie on your back with your knees bent and feet flat on the floor about hipwidth apart. Rest your arms wherever they’re most comfortable. Start with your pelvis in a level position with the natural curve in your lower spine. See photo A.

The exercise
As you exhale, draw your abdominals in toward your spine and gently press your back down, tilting your pelvis backward. Don’t tilt your head up and back or hunch your shoulders. As you inhale, return your pelvis to a level position. See photo B.

Do’s and don’ts
  • DO keep your head, neck, and shoulders relaxed.
  • DON’T lift your lower back off the floor as you tilt your pelvis up.
  • DON’T arch your back off the floor when you lower your hips back down.

Other options
Chair tilt (easier): Lie on your back and place your heels up on the seat of a chair with your knees bent at a right angle and thighs perpendicular to the floor. Then perform the exercise exactly as the basic version.
Bridge (harder): At the top of the pelvic tilt, continue peeling your spine off the floor until only your shoulder blades and shoulders remain on the floor. Work hard to keep your abdominals pulled inward to prevent your back from sagging. Hold a moment and slowly lower your body downward.

Getting a Lower Back Workout


We often take for granted the role that our lower back muscles play in our everyday mobility. So, while your lower back muscles need to be strong, they also need to be flexible.
This balance between strength and flexibility is particularly important with your lower back. That’s why we include the pelvic tilt, which both strengthens and lengthens out the muscles attached to your spine.
With the widespread incidence of lower back pain among adults, everyone should practice this exercise. The same goes for back extension exercises. However, if you’re experiencing back pain right now or have a history of back trouble, check with your doctor before performing any extension exercises. When you do a lower back exercise, you should feel a mild pull or pressure build within the muscle, not a sharp pain. If you do feel a piercing pain, back off. Review the exercise description to make sure that you haven’t pushed your body too far and then try the movement again. If you still feel pain, seek medical advice before proceeding.
You may feel a dull ache in your back a day or two after you’ve worked your lower back. This is normal. But if the pain is sharp and so debilitating that your most upright posture looks like you’re trying to duck under a fence, you’ve either pushed yourself too far or you have a back problem.

Enjoying a Strong Lower Back

Most lower back exercises — particularly those appropriate for beginners —don’t involve free weights or machines. Usually, it’s just you and the floor.
Here’s what you can accomplish without any equipment at all:
  • Real-life benefits: Sitting puts your spine under a lot of pressure, much more pressure than if you stood all day, and particularly compresses your lower spine. That’s why your lower back feels sore after a day in front of the computer. When your back muscles are weak, you tend to slouch or arch your back, which places the spine under even more stress. In addition to strengthening and stretching your lower back on a regular basis, you should get up a few minutes every hour when you’re sitting throughout the day.
  • Injury prevention: Ironically, even people with chronic lower back pain tend to neglect lower back exercises, often because they’re afraid of inflicting even more damage. Also, while people have gotten the message that abdominal exercises help alleviate back pain, many don’t realize that lower back exercises are equally important in this pursuit. When one of these sets of muscles is stronger or more flexible than the other, your posture is thrown off kilter, and you’re more prone to back pain. This scenario is common.
  • The “feel good” factor: Strengthening your lower back helps you stand up straight, which, in turn, makes you look taller, as much as 5 pounds slimmer, and gives you a more confident, commanding presence.

Assisted pull-up

The assisted pull-up targets your back, with additional emphasis on your shoulders and biceps.
Be careful if you have lower back or shoulder problems.

Getting set
Step up on the platform of an assisted pull-up machine (sometimes called a gravitron) and carefully kneel onto the kneepads. (Some versions require you to stand.) Grab the handles that place your palms facing forward and straighten your arms. Pull your abdominals in and keep your body tall. See photo A.

The exercise
Pull yourself up until your elbows point down and then slowly lower your body back down. See photo B.

Do’s and don’ts
  • DO relax your shoulders so they don’t hunch up by your ears.
  • DON’T rock your body to help move you up and down.
  • DON’T arch your back or round forward.
  • DON’T dawdle at the bottom of the exercise. Move steadily until you finish your reps.
Other options
Different grips: Some assisted pull-up machines have a choice of wider or narrower grips. Experiment with your hand placement to see which ones you like best.
Bar pull-up (harder): Using a Smith machine or power cage, set the bar so that it is securely resting against the stops set in the center of the frame. Grasp the center of the bar with your hands a few inches apart and palms facing you. Kick your legs out in front of you so that your torso forms a 45-degree angle with the floor. Bend your arms and pull yourself upward until the top of your chest touches, or nearly touches, the bar. Slowly lower to the start position.

Thursday, November 13, 2008

Cable row

The cable row strengthens your back, along with your biceps and shoulders.
Be careful with the cable row if you’ve had lower back or shoulder problems.

Getting set

Hook the short straight bar attachment onto a low pulley. Place a riser from a step bench (or box of similar length) directly against the base of the cable tower. (Some machines come with a foot bar so you don’t need to add a box.) Sit facing the tower with your legs slightly bent and hip-width apart, and your feet firmly planted against the riser. Grasp the handle and straighten your arms out in front of your chest. Sit up as tall as you can, sliding your shoulders down, pulling your abdominals in and lifting your chest. See photo A.

The exercise

Sitting up tall, pull the handle toward the lower part of your chest, squeezing your shoulder blades together as you pull. Your elbows should travel straight back, arms brushing lightly against your sides as you go. Without stretching forward, straighten your arms slowly back to the start. See photo B.

Do’s and don’ts
  • DO feel this exercise in your back, not just in your arms. Concentrate on starting the pull with the outer edges of your back.
  • DON’T arch or round your back.
  • DON’T rock back and forth to help you lift and lower the weight.

Other options
Extended row: The basic version of this exercise is excellent for targeting the upper back muscles. However, you can strengthen your lower back at the same time by leaning forward a few inches at your hips as you stretch your arms out and by leaning back slightly as you pull the handle toward you. Some exercise purists scorn this version because it doesn’t “isolate” your upper back, but the extended row works the upper and lower back work together and is great for people who do a lot of rowing or activities: weeding, dancing, or climbing. However, skip this version if you have a history of low back pain.
One-arm cable row: Attach a horseshoe handle and perform this row one arm at a time.

Lat pulldown

The lat pulldown is primarily a back exercise, although your shoulders and biceps also see some action. Try switching grips and attachments to give this exercise a different feel.
When engaging in the lat pulldown, be careful if you have shoulder or lower back problems.

Getting set
Before you start, sit in the seat and adjust the thigh pads so your legs are firmly wedged underneath the pads with your knees bent and your feet flat on the floor. Stand up and grasp the bar with an overhand grip and your hands about 6 inches wider than shoulder-width apart. Still grasping the bar, sit back down and wedge the tops of your thighs (just above your knee) underneath the thigh pads. Stretch your arms straight up, keep your chest lifted, and lean back slightly from your hips. See photo A in Figure 11-6.

The exercise
In a smooth, fluid motion, pull the bar down to the top of your chest. Hold the position for a moment, and then slowly raise the bar back up. When you’ve completed the set, stand up in order to return the weights to the stack. Don’t just let go of the bar while you’re seated — the sudden release causes the weight stack to come crashing down. See photo B in Figure 11-6.

Do’s and don’ts
  • DON’T rock back and forth in an effort to pull down the weight.
  • DON’T lean way back as you pull the weight down. Keep that inch-or-two lean that you had at the beginning of the movement.
  • DON’T move so quickly that you jerk your elbows or shoulders.
  • DON’T bend your wrists.

Other options
Changing your grip: Experiment with the width of your grip and the orientation of your palms to give this exercise a different feel. For example, use the triangle attachment for a triangle-grip lat pulldown. Or use an underhand grip (reverse-grip lat pulldown) and hold near the center of the bar for a pulldown that feels similar to a chin-up. Avoid pulling the bar behind your neck Experiment with other attachments of varying lengths and curves, such as the short straight bar and rope.

Machine row

The machine row focuses on your back, with additional emphasis on your shoulders and biceps.
Take special care performing this exercise if you’ve had lower back or shoulder injuries.

Getting set
Sit facing the weight stack of the machine with your chest against the chest pad. Adjust the seat so your arms are level with the machine’s handles and you must stretch your arms fully to reach them. This adjustment is important —and one that many people forget to make. If you can’t fully straighten your arms when you grasp the handles, you’ll end up using your arm muscles a lot more than your back muscles. Grasp a handle in each hand, slide your shoulders down, and sit up tall. See photo A.

The exercise
Pull the handles toward you until your hands are alongside your chest. As you bend your arms, your elbows should travel directly behind you, not out to the side. At the same time, squeeze your shoulder blades together. Slowly straighten your arms, feeling a stretch through your shoulder blades as you return the handles to their original position. See photo B.

Do’s and don’ts
  • DO sit up even taller as you pull the weight.
  • DON’T lean back so far that your chest comes off the pad as you bend your arms.
  • DON’T round your back or lean forward as you return the handles to the starting position.
  • DON’T stick your neck forward as you pull the weight.

Other options
Other machines: Although each manufacturer has its own version of the machine row, the same basic rules apply. Depending on the brand, the handles may be parallel, perpendicular, or diagonal; some machines have all three grips. Experiment with different grips to get a different feel from this exercise.
Advanced machine row (harder): Do this exercise without keeping your
chest on the chest pad. Without the support, you have to work harder to sit up straight.

Dumbbell shrug

The dumbbell shrug is a small movement with a big payoff: It strengthens your shoulders and the trapezius muscles of your upper back. Be careful if you’re prone to neck problems.
Getting set
Stand tall and hold a dumbbell in each hand, arms straight down, palms in front of your thighs and facing in. Pull your abdominals in, tuck your chin toward your chest, and keep your knees relaxed. See photo A.

The exercise
Shrug your shoulders straight up toward your ears the same way you do if you don’t know the answer to the $500 geography question on Jeopardy! Slowly lower your shoulders to the starting position. See photo B.

Do’s and don’ts
  • DO keep your neck and shoulders relaxed.
  • DON’T roll your shoulders in a complete circle — a common exercise mistake that places too much stress on your shoulder joint.
  • DON’T move body parts other than your shoulders.

Other options
Barbell shrug: Hold a bar with your hands shoulder-width apart and in front of your thighs, palms facing in. Do the exact same movement as in the basic version.
Shrug roll (harder): Shrug your shoulders upward as in the basic version, squeeze your shoulder blades together, and then lower them back down. This version brings the trapezius and rhomboids (two back muscles) into the mix.
Modified upright row: Stand tall with your feet hip-width apart and hold a barbell in front of you at waist level. Place your hands about 6 inches apart. Bend your elbows to raise the bar upward until the bar is just above the level of your bellybutton. Slowly return to the start.
We don’t recommend the full upright row, which involves pulling your arms up until the bar is directly underneath your chin. This movement can be hard on your shoulder joints, rotator cuff, tendons, and ligaments.

Dumbbell pullover


The dumbbell pullover is mainly a back exercise, but it also works your chest, shoulders, biceps, and abdominals.
If you have shoulder or lower back problems, you may want to skip this exercise because the dumbbell pullover requires raising your arms overhead, while stabilizing your spine.
Getting set. Holding a single dumbbell with both hands, lie on the bench with your feet flat on the floor and your arms directly over your shoulders. Turn your palms up so one end of the dumbbell is resting in the gap between your palms and the other end is hanging down over your face. Pull your abdominals in, but make sure that your back is relaxed and arched naturally. See photo A.

The exercise
Keeping your elbows slightly bent, lower the weight behind your head until the bottom end of the dumbbell is directly behind your head. Pull the dumbbell back up overhead, keeping the same slight bend in your elbows throughout the motion. See photo B.

Do’s and don’ts
  • DO make sure that you grip the dumbbell securely.
  • DO concentrate on initiating the movement from the outer wings of your upper back rather than simply bending and straightening your arms.
  • DON’T arch your back up off the bench, especially as you lower the weight.
  • DON’T lower the weight too far behind you.
Other options
Barbell pullover: Do this same exercise with a bar, holding the bar in the center with your palms facing up. Another variation on the same theme: Hold a dumbbell in each hand with your palms facing in.
Machine pullover: Many gyms have a machine that mimics the action of a dumbbell pullover while you’re in a seated position. Cross bench pullover (harder): Perform this exercise squatting in front of the bench and resting your shoulders on the top. Because your body isn’t supported by the bench, you have to work extra hard to maintain good form; this variation kicks in all the deep muscles in the back and abs.

Wednesday, October 29, 2008

One-arm dumbbell row


The one-arm dumbbell row targets your back but also emphasizes your biceps and shoulders.
Be careful with this exercise if you have lower back problems.

Getting set
Stand to the right of your weight bench and hold a dumbbell in your right hand with your palm facing in. Pull your abdominals in and bend forward from your hips so your back is arched naturally and roughly parallel with the floor. Bend your knees slightly. Place your left hand on top of the bench in line with your left shoulder for support and let your right arm hang down underneath your right shoulder. Tilt your chin toward your chest so your neck is in line with the rest of your spine. See photo A in Figure.

The exercise
Pull your right arm up, keeping it in line with your shoulder and parallel to the ceiling. Lift your arm until your hand brushes against your waist. Lower the weight slowly back down. See photo B in Figure.

Do’s and don’ts
  • DO remember that, although your arm is moving, this is a back exercise. Concentrate on pulling from your back muscles (right behind and below your shoulder) rather than just moving your arm up and down.
  • DO keep your abs pulled in tight throughout the motion.
  • DON’T allow your back to sag toward the floor or your shoulders to hunch up.
  • DON’T jerk the weight upward.

Other options
Rotation row: As you lift the dumbbell, rotate your arm so your palm ends up facing backward. This position gives the exercise a different feel and places extra emphasis on your biceps.
Barbell row: Place a barbell on the floor and stand about a foot away from it. With your knees bent, bend down and grasp the bar in an overhand grip with your hands a little wider than your shoulders. Pull your abs in tight and don’t let your back arch. Keeping your hips bent so that your torso is at a 45-degree angle to the floor, pull the bar toward the lower part of your chest and then slowly lower it back down. You can also perform this exercise with an underhand grip or with your hands a bit closer together.

Avoiding Mistakes When Working Your Upper Back


The upper back is one area where we see a lot of attempted heroics. With pulldowns and rows, people tend to pile on more weight than they can handle and end up trying to throw their entire body weight into the exercise to move the weight. This sort of behavior won’t train your back muscles and may result in injury.
Follow these tips to avoid injury when training your upper back:
  • Don’t rock back and forth or wiggle around. In an effort to pull the weight toward them, many people squirm around to build up momentum, but that’s the last thing you want; instead, rely on your own muscle power. If you find yourself shifting around in order to lift and lower the weight, drop down a few plates.
  • Don’t lean too far back. You may be able to lift more weight when you lean way back, but that’s because you have better leverage and you’re using your body weight to cheat, not because your back muscles get a better workout. A more upright posture ensures that your back muscles are in the prime position to do maximum work. Any time you pull something toward you, slide your shoulders down, squeeze your shoulder blades together, and sit up tall. With pulldowns, you can lean back ever so slightly, but for rows you need to be sitting as tall as you do when your flight attendant demands that you return your seat back to its full upright position with your seat belt fastened and tray table locked.
  • Don’t pull a bar down behind your neck. There are endless variations of the pulldown exercise, but one now frowned on by many exercise experts is the behind-the-neck pulldown. Critics of this exercise say that your arms twist so far back that your upper arm bones get jammed into your shoulder sockets, which could overstretch your ligaments and strain those delicate rotator cuff muscles. Unless you’re a rock climber, an avid rower, or a swimmer who favors the butterfly stroke, front pulldowns will suffice.

Getting an Upper Back Workout


Upper back exercises fall into three general categories: pulldowns and pullups, rows, and pullovers. Later in this chapter, you discover a variety of exercises in each category. For the most complete upper back workout, perform at least one exercise from each category, although you needn’t do all these exercises in the same workout.
  • Pulldowns and pull-ups: With a pulldown, you grab a bar attached to an overhead pulley and pull it down; with a pull-up, you grasp a bar above you and pull yourself up. If you exercise at home, use an exercise band to mimic the pulley machine and do the band lat pulldown. Pulldowns and pull-ups are grouped in one category because they work your back in the same way. Both types of exercises involve your lats, traps, and rhomboids, but they also rely heavily on your biceps, shoulders, and chest muscles. If you’re looking to develop a broader back and improve your posture, emphasize pulldowns and pull-ups. For example, you can do a pulldown with a band.
  • Rows: What I am about to tell you may be shocking, but rowing exercises are similar to the motion of rowing a boat. (I know. You’re amazed.) You may perform rows with a barbell or dumbbell, a set of machine handles, a bar attached to a low cable pulley, or an exercise band. Rowing exercises use the same muscles as pulldowns and pull-ups except that they don’t involve your chest. Rows are particularly helpful if you want to find out how to sit up straighter (to perform a row correctly on a machine, you have to sit up tall).
  • Pullovers: When you do a pullover, your arms move up and down in an arc, like when you pull an ax overhead to chop wood. Pullovers rely mainly on your lats, but they also call upon your chest, shoulder, and abdominal muscles. Like the other upper back exercises, pullovers help with posture. A pullover is an ideal transition exercise from a back workout to a chest workout. In other words, use a pullover as the last exercise of your back workout and as a prelude to your chest exercises because your chest will be warmed up.
Whether you’re performing pulldowns, pull-ups, rows, or pullovers, remind yourself that these exercises first and foremost strengthen your back muscles, not your arms. Think of your arms merely as a link between the bar and your back muscles, which should do the bulk of the work. Concentrate on originating each exercise from the outer edges of your back. This bit of advice may be difficult to relate to at first, but as you get stronger and more sophisticated, your body awareness improves and you know exactly where you should feel each exercise.
Most of the upper back exercises in this chapter involve weight machines or cable pulleys. If you work out at home and you don’t have a multigym (a home version of health club machinery), use a rubber exercise band to mimic the pulley machine.

Strengthening your back muscles has important advantages


  • Real-life benefits: With a strong upper back, you’ll find it easier to drag your kids into the dentist’s office or lug your suitcases through endless airport terminals. You’ll say goodbye to slouching as your posture improves and get rid of tension in your neck and shoulders.
  • Injury prevention: Strong upper back muscles play a significant role in keeping your shoulders healthy. Your lats handle most of the work in pulling movements, so you don’t overstress your shoulders. For example, well-developed upper back muscles could save you from injury when unfolding the sofa bed for a houseguest.
  • The confidence or the “feel good” factor: Upper back exercises make your back more broad, which, in turn, slenderizes your lower body. These exercises also improve your posture by helping you stand straighter and taller, open up your chest, and give up slumping as a pastime.

Understanding Upper Back Muscle Basics


Pull up a chair and let’s talk about your upper back muscles. There. You just used ’em. No, that wasn’t a trick. In fact, you use your upper back muscles whenever you pull anything toward you, whether it’s a piece of furniture, a stubborn golden retriever on a leash, or the mountain of chips you won at your Thursday night poker game.
Your upper back consists of several
  • Latissimus dorsi (lats): The largest muscles in your back run from just behind each armpit to the center of your lower back. Olympic swimmers, particularly those who swim butterfly, have well developed lats. These muscles give swimmers that V-shaped torso. The main purpose of your lats is to pull your arms (and anything in your hands) toward your body.
  • Trapezius (traps): Above the lats are your two traps. Together, your traps look like a large kite that runs from the top of your neck to the edge of your shoulders and narrows down through the center of your back. Your traps enable you to shrug your shoulders (like when your spouse asks how you could’ve forgotten to pay the phone bill). More important, your lower traps stabilize your shoulders and help prevent shoulder injuries and your upper traps help you to move your head to the back, side, or to look behind you.
  • Rhomboids: Your rhomboids cover the area between your spine and your shoulder blades. Along with your traps, you use your rhomboids for squeezing your shoulder blades together. You have to call them your rhomboids, because boids somehow never caught on. Most people who work long hours at computers or in other seated positions have overstretched and weak rhomboids.

Friday, October 17, 2008

Studying Breathing Techniques for Exercise


The exercise descriptions in this blog don’t include breathing instructions because too many extra instructions amounts to information overload. Nevertheless, proper breathing technique is important, so to spare you the overkill, we’re only going to say this once. You’ll thank us later. But don’t forget to breathe. Promise? Okay. Here are the general rules:
  • Inhale deeply through your nose to bring in a fresh oxygen supply during the less difficult part of an exercise (such as when you lower the weight during a bench press). Inhaling provides the spark of energy for your next repetition.
  • Exhale deeply through your mouth during the most difficult part of the exercise, also known as the exertion phase or the sticking point. During the bench, for example, pressing the bar up is the exertion phase, so exhale as the bar travels upward.
Exhaling protects your lower back by building up pressure that acts as a girdle to hold your spine in place. Exhaling also ensures that you don’t hold your breath so long that you pass out. Before the hard-core weight lifting contingency sends irate letters, note that these breathing directions are for non-maximal lifts. World-class powerlifting isn’t discussed here. If you plan to compete in powerlifting, you need to use a slightly different breathing technique than the one described above. Because we don’t think that many of you plan to enter such competition (at least not immediately), we won’t bore you with the details.

Maintain proper posture

Proper posture is an all-encompassing phrase that includes everything that we’ve mentioned in this section. This phrase is used often because good posture is so important — and because our posture often goes down the tubes when we focus on lifting and lowering a weight. Good posture isn’t automatic for most of us, so give yourself frequent reminders. And if you exercise with correct posture, you’ll train your muscles to hold themselves correctly in everyday life. Throughout these chapters, the Posture Patrol icon reminds you to maintain good posture.

Keep your shoulders and neck relaxed and tilt your chin

If your shoulders are hunched up near your ears, you need to relax. Hunched shoulders may be linked to holding the phone to your ear or sitting at your computer all day long, absorbing workday stress. If you’re prone to hunching, think about lengthening your shoulder blades, as if they’re dropping down your back, and try to keep them there as you perform the exercise. Strengthening your shoulder stabilizer muscles, such as the mid-upper back and external rotators, improves your ability to keep your shoulders down.

Tilt your chin just enough to fit your closed fist between your chest and your chin. This position lines up the vertebrae of your neck with the rest of your vertebrae. (Because your neck is a continuation of your spine, it should stay in the same general line as the rest of your vertebrae.) So don’t tilt your chin back or drop it toward your chest like you do when you sulk. These two movements strain your neck and place excess pressure on the top vertebrae of your spine.

Monday, September 22, 2008

Don’t lock your joints

The phrase “Don’t lock your joints” refers to your elbows and your knees. Locking a joint means straightening it so completely that it moves past the point where it normally sits at rest. For example, you don’t usually stand with your quadriceps (front thigh muscles) as tight as can be with your kneecaps pulled up; that’s a locked knee. Locking your knees isn’t only bad news for your knee joints, but it also causes lower back pain. It can even lead to more serious injuries. One of our friends actually knew someone who passed out when he was singing at a choir concert because he locked his knees — he fell right off the back of the riser. And locking the knees is a way of cheating when you perform exercises in a standing position, such as the lateral raise and the barbell biceps curl.
Locking your elbows places excessive pressure on your elbow joints, tendons, Constant elbow locking causes tennis elbow (an inflammation of the elbow tendons), even if you’ve never held a tennis racket in your hand. Locking your elbows also contributes to bursitis through the rupturing of the bursa (little lubrication capsules) located in your joints. Bursitis
results in swelling, pain, and tenderness at the elbow. Snapping your elbows also is a form of cheating because the weight is temporarily shifted off your muscle and on to the bone. When you snap your elbows, your muscles fail to get the proper workout.

SStand up tall with square shoulders and a lifted chest

Keep your head centered between your shoulders, and don’t round your shoulders forward. In other words, avoid slouching. Your chest should be comfortably lifted, not forced; you needn’t stand like a soldier at attention. Avoid arching your upper back and pushing your ribs forward.

Pull in your abdominals

Place your hand over your belly button and gently pull your belly button in and away from your hand; that’s what it feels like to pull in your abdominal muscles. Don’t try to create a vacuum or suck your stomach into your ribs as if someone was going to punch you. Just hold your abs slightly in toward your spine. Tightening your abs helps hold your torso still when you exercise and keeps your back from arching or rounding — mistakes that can lead to back injury.

Tackling the Basic Info


For every muscle group presented in this blog (such as back, chest, or shoulders), first we show the non-machine exercises — moves involving dumbbells, barbells, or no equipment at all. Next are exercises that do require weight machines. Explanations include at least one machine per muscle group (except the abdominals). Figures 1 and 2 show you the major muscle groups in your body.
If we tried to show you every exercise in existence, this blog would be thicker than the unabridged edition of the Oxford English Dictionary. So, we’ve chosen to present the most common, basic exercises — classic moves that not only are safe and appropriate for beginners but also are standard moves for veteran exercisers.
If you have knee, hip, back, or other orthopedic problems, look for the Joint Caution icon; this icon alerts you to exercises that you may want to avoid or modify. Instructions are given on how to adjust many of the exercises to work around your joint problems.
After presenting each exercise, the “Other options” section describes a number of other versions of the workout. Some of the options are easier than the basic version, requiring less coordination or strength. Others are tougher. Some options, neither easier nor harder than the basic version, simply work the muscle from a different angle.
After you feel comfortable with the basic version, expand your horizons by experimenting with the options. You may discover, for example, that you prefer to do the dumbbell shrug with a barbell instead. Or maybe you enjoy both versions and want to alternate them in your workouts. However, don’t get overly enthusiastic and try all options of an exercise in a single workout. Experiment with one or two new versions each time you work out, and concentrate on mastering the movement.

Friday, September 12, 2008

Carrying a Weight Plate Too Casually

We often listen to exercisers gripe that their backs hurt after they perform the bench press. Yet when we go to check out their technique, it looks impeccable. We’re baffled — until these people pop off the bench, slide the weight plates off the bar, and put them back on the weight tree. Ah ha! Mystery solved. It’s not the bench press or any other exercise that’s giving them an aching back; the way exercisers carry around those big, heavy weight plates is the culprit.

Carrying a weight plate the wrong way
Sometimes we see people carrying weight plates around the gym floor as if the plates were super-size Frisbees. Other lifters tuck plates under their arms as if they’re clutching a purse. Or they hold the plate on the edge of their fingertips with a straight arm and locked elbow, as if they’re carrying a bowling ball Carrying around a lot of weight with one hand tied behind your back may be the ultimate display of macho, but even if you’re a big, strapping fellow, this sort of behavior puts your body in a terribly unbalanced position because you’re adding all the weight only on one side of your body. Your elbows and shoulders bear more of the burden than they’re designed to handle. See photo A.

Carrying a weight plate the right way
Hold the plate close to your chest with both hands. Stand as close as you can to the bar, line up the hole in the plate with the bar, and then slide the plate on. Don’t just extend your arms out straight and toss the plate as if you’re performing some sort of ring-tossing circus act. When you pick up a plate off the floor or from a low rung on a weight tree, bend your knees as if you’re doing a squat, bring the weight in close to your chest, and stand up using your leg muscles, not your lower back. All this advice goes for lighter weights, too. See photo B.

Spotting Too Much — Or Not Enough

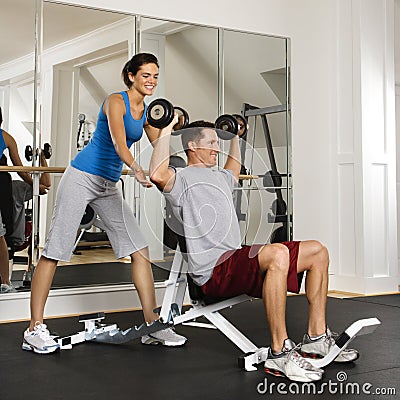
Most weight-training mistakes made don’t affect anyone but you. However, if you mess up while spotting someone else, you may be putting your friend (or soon-to-be ex-friend) at risk for injury. Or, at the very least, you may be depriving your buddy of an enjoyable and effective workout. When acting as a spotter, you need to walk that fine line between not helping enough and getting too involved.

Spotting the wrong way
Don’t zone out while you’re spotting someone. Spotting isn’t the time to contemplate peacekeeping solutions in the Middle East. If your buddy poops out in the middle of a set and you’re even a split second too late to grab the weight, your friend may get clunked on the head, chest, or some other body part. Your spottee may also tear a muscle or ligament while trying to do your job for you (that is, to save the weight from crashing). Pay attention. You would want the same courtesy paid to you. See Figure.

Spotting the right way
Tune out everything in the universe other than your spottee. Put your hands in the right place, and watch your buddy like a soldier guarding Buckingham Palace. Don’t wait for your spottee to scream, “Dude! Where are you?!”

Sitting Up Improperly from a Weight Bench

Liz was spotting a woman who was performing a textbook-perfect set of the dumbbell chest fly. The set was truly a thing of beauty —until right after her final repetition. Suddenly she extended her arms straight out, lowered the weights toward the floor, opened her hands, and let the weights roll off her palms. She then jerked herself upright and popped up off the bench. Overall, she managed to make about a half dozen mistakes on movements that weren’t even part of the actual exercise. Realize that you can’t let your guard down until you’ve safely gotten yourself out of the exercise position.

Sitting up the wrong way
In this blog, many exercises that you perform while lying on your back on the floor or on a weight bench are shown. When you sit up after doing these exercises, don’t jerk straight back up into a sitting position, especially if you’re holding weights. When you get up suddenly, you can adversely impact your blood pressure and experience a moment of dizziness. You want to avoid any type of sudden or jerky movement when you’re holding weight because the weight can create momentum and cause you to lose control over your movements.
Another no-no: bringing your arms straight out to the sides and dropping the weights, or twisting to either side to drop a weight. See photo A. You never want to drop weights. You always want to put weights down slowly and with control to avoid hurting yourself and others

Sitting up the right way
To protect your lower back when you get up off the floor, roll to the side and then use both arms to push up into a sitting position. Or you can hug one knee into your chest and gently rock yourself up. After performing an exercise involving dumbbells, such as the chest fly, bring the weights down into your chest, and then roll up. (When you begin the exercise, do the opposite: Bring the weights into your chest and rock yourself back on the bench.) See photo B.

Tuesday, August 26, 2008

How to Row Properly?

If you sit hunched over in a chair most of the day, you’re a good candidate for goofing up the seated cable row.

Rowing the wrong way
One common mistake found in rowing is rounding your back or allowing your shoulders and neck to droop forward. This slumped posture puts your neck and lower back in a pressure cooker. Another problem: leaning way back like someone involved in a game of tug of war. See photo A. Rowing with poor posture reinforces bad postural habits. Rather than becoming more fit, you’re risking back injury and practicing bad posture. What you train is what you get, according to specificity of training. Train with good posture to develop good posture.

Rowing the right way
Sit up tall with your abdominals pulled in. Your upper body, from the top of your head to your belly button, should be perpendicular to the floor. Bend your knees as much as you need to in order to maintain this posture. Allow your arms to stretch fully out in front of you without losing that perpendicular posture. Then when you pull the bar toward your chest, sit up even taller and bring your hands into your body, just below your chest. Squeeze your shoulder blades together as you pull, and drive your elbows straight back behind you. See photo B.

How to Use leg curl machine properly?

The leg curl, is the most popular hamstring (rear thigh) exercise; unfortunately, performing this exercise incorrectly is also quite popular. In general, you don’t want to allow your butt to stick up in the air as you exercise (with the exception of the downward-facing dog exercise in yoga). When you’re doing an exercise such as the push-up or plank, if your butt is in the air, it means that you’re relying more on your legs instead of your abdominals to stabilize your torso. In the case of certain machine exercises, sticking your butt up in the air means you’re not isolating the correct muscle group.

Using the leg curl machine the wrong way
Watch people use the leg curl machine and you’ll see that as they kick their legs toward their butt, their hips lift off the support pad, and their butt sticks up about 2 inches. This mistake is subtle, but it’s a sneaky way of taking work away from your hamstrings and transferring the effort to your hip muscles, allowing the hamstrings to avoid doing the work that they need to do to get stronger. See photo A

Using the leg curl machine the right way
To prevent your hips from popping off the pad, raise your upper thighs just a hair off the pad before you bend your knees for the kick upward. In this position, you feel your hamstrings working a lot harder. See photo B

How to Pull down a bar properly?

Pulling a bar down to your chest isn’t as simple as it may appear. To give your back muscles a workout and to protect yourself from injury, you need to make sure that the bar travels in a specific path.

Pulling down a bar the right way
Here are tips for performing a perfect lat pulldown. Choose a weight that’s challenging but not so heavy that you feel like you’re dangling off the end of a helicopter ladder. Sit down — taking the bar with you — and wedge your thighs under the thigh bar. Now lean just a few inches backward and keep your abdominal muscles pulled in to support your lower back. Pull the bar toward the top of your chest, lifting your chest to meet the bar. Take your time so that the bar remains level throughout the movement. Don’t sway back and forth: Rock and roll is dead here. When you’ve completed your set, stand up and gently deposit the bar back where it belongs. If you open your hands and let the weight plates come crashing down, you’ll startle everyone else in the weight room and you may damage the equipment. The exercise isn’t finished until you’ve completely lowered the weight stack with control. See photo B.

Pulling down a bar the wrong way
One common mistake — a mistake that places your shoulder joint and muscles in jeopardy — is pulling the bar straight down toward your lap rather than toward your chest. A second error occurs when you pull the bar down unevenly — one end of the bar may be 6 inches lower than the other. But perhaps our biggest pet peeve is leaning way back as you pull the bar down and then rocking forward as the bar travels upward. Generating this type of momentum helps you move a lot of weight, because you’re using your body weight instead of your muscles to help you pull down the bar. Because you’re not using your muscles to move the bar, this “trick” doesn’t improve your back strength. See photo A.

How to Lower Your Arms Properly?

We hate to pick on chest exercises again, but they’re often the victims of multiple mistakes.

Lowering your arms the wrong way
When doing chest exercises, some people drop their elbows so low that they practically touch the floor. The resulting stretch in your chest muscles may feel good, but at this point, your chest muscles and your shoulder ligaments are in danger of snapping, much like a rubber band that’s pulled too far. Also, when you lower your arms too far, you shove the head of your big arm bone — the humerus — way up into your shoulder socket. The rotator cuff muscles and nearby ligaments and tendons must twist themselves in unspeakable ways to accommodate this unnatural position. You may not feel pain immediately, but sooner or later, all this twisting may catch up to you and result in shoulder pain and injury to your shoulder joints. See photo A.

Lowering your arms the right way
When you perform the dumbbell chest press, bench press, or chest fly, stop lowering your arms when your elbows are slightly below chest level. Depending on the build of your body, the bar may touch your chest on the bench press. See photo B.

How to Arch Your Back?

In general, you don’t want to over arch your lower back during any strength training exercise. Your lower back already has a natural curve. Over-arching creates tremendous pressure to the discs in the lower back and creates a high risk of injury. In particular, you don’t want to arch your back when you do the bench press. Note that when you do a back extension exercise, the curvature of the back should be distributed along the entire length of your spine rather than focused in the lower back.

Bench-pressing the wrong way
Some weight lifters think that anything they do to pile on poundage — including arching their back and squirming around — is fair game. In reality, how much weight you hoist above your chest isn’t necessarily related to how strong your chest muscles are. When you arch your back, you simply increase your mechanical advantage (and your injury risk); more muscles pitch in to move the bar upward. We know one guy who convinced himself that arching was an essential part of the bench press. We produced several anatomy textbooks before we convinced him that we hadn’t fabricated this bit of information.

Bench-pressing the right way
Keep your back in contact with the bench throughout the exercise. You don’t need to force your back into an unnaturally flat position — it’s okay to have a small, natural arch under your lower back. If you can’t plant your feet flat on the floor because the bench is too high, place your feet on the bench.

Wednesday, August 13, 2008

Squatting mistakes

The squat strengthens virtually every muscle in your lower body: your butt, front thighs, rear thighs, and lower back. The squat even improves your sense of balance. That’s good for a move that essentially mimics getting in and out of a chair. But if you don’t do this exercise correctly — and many people don’t — you’re asking for an injury.

Squatting incorrectly
We know one guy who spread his legs practically into the splits and lowered his butt all the way to the floor when squatting. Then he’d pop back up into a standing position so forcefully that he was close to being airborne. After a few months, this guy began showing up at the gym with ace bandages wrapped around his knees. Small wonder! When you do squats with such incorrect form, it’s easy to injure your knees. Another common error is leaning too far forward and letting your knees shoot out past your toes. Two other problems: dropping your knees inward or letting them bow to the outside. These mistakes put incredible pressure on the delicate tendons, ligaments, and cartilage that hold the knee in place and lead to knee injuries. See photo A of Figure.

Squatting properly
Start with your feet hip-width apart and point your toes straight ahead or angled slightly outward — whichever foot position is more comfortable and allows your knees to travel over your feet. As you squat down, your knees should travel in a straight line, in the direction that your toes are pointed. Never squat so low that your thighs are lower than parallel to the ground. When you stand up, press through your heels, and finish with your legs straight but relaxed. Snapping your knees places pressure on your knees and sends your lower back into an extreme arch. See photo B of Figure. Practice doing the squat sideways in front of a mirror so you can see your form by turning your head. Alternatively, you can ask a friend or spotting partner to watch and correct you, or work with a personal trainer. Don’t add weight to your squat until you’re positive that you can do the movement properly. Always check and make sure that your knees travel in the same direction as your toes.

Cheating Your Abs


To listen to abdominal gadget infomercials, you’d think that performing an abdominal crunch correctly without some sort of machinery was impossible. The truth: You’re perfectly capable of crunching correctly without any equipment. But first, you must realize the common mistakes of the crunch to know how to do the exercise properly.

Crunching incorrectly
Many people complain that crunches cause neck pain. They do — but only if you yank your head and neck instead of lifting your torso by the power of your abdominals. Another mistake is lifting your torso straight off the floor, rather than curling it upward. How do you know whether you’re curling or just lifting? Do the basic crunch and freeze at the top of the movement. Your torso should be in a slightly rounded, almost Cshaped position. A third crunch error: forgetting to breathe.

Crunching properly
To avoid jerking your neck, place your fingertips and thumbs behind your head and don’t lace your fingers together. Hold your elbows out wide and keep your shoulders relaxed. Your arm placement is correct if you can barely see the points of your elbows out of the corners of your eyes. As you curl up, keep your head, neck, and arms frozen in position. When you curl the right way, your head, neck, and lower back feel nearly weightless. Finally, breathe correctly. As you lift your torso, exhale forcefully through your mouth; as you lower, inhale through your nose.

Active Isolated (AI) Stretching

What it is: Active isolated (AI) stretching involves tightening the muscle opposite to the one that you’re planning to stretch and then stretching the target muscle for two seconds. You repeat this process 8 to 12 times before going on to the next stretch. By stretching for such a brief period of time, you don’t give the muscle enough time to trigger its stretch reflex. What’s the purpose of tightening the muscle opposite the one you’re stretching?
When a muscle tightens, the opposing muscle has no choice but to relax. Although Active isolated stretching has been around since the 1950s, it’s just now gaining popularity — largely through the efforts of father-and-son physiologist team Phil and Jim Wharton, authors of The Whartons’ Book of Stretching (Times Books). Many sports teams and elite athletes, including one of the world’s fastest humans — sprinter and Olympic gold medalist, Michael Johnson — also favor the AI method. Researchers are currently studying this method and may soon offer more insight into its benefits.
AI stretching has its advantages:
  • Many AI stretching exercises do a good job of isolating one muscle group at a time. For example, with an AI stretch, you can stretch the hamstrings without involving the lower back and hip muscles.
  • If you’re particularly weak in one area or are rehabilitating a muscle from injury, the tightening may help strengthen that muscle.
  • Many people find AI stretches less painful than traditional stretches.
This method of stretching also has disadvantages:
  • The technique is harder to master than traditional stretching, and some of the positions are difficult to get into.
  • AI stretching is time consuming. You need about 20 minutes to stretch your entire body, whereas you can do an adequate traditional stretch routine in 5 to 10 minutes.
Sample AI Stretch (see Figure): This move stretches your calf muscles.
Hold one end of a belt or towel in each hand. Sit on the floor, and lift your left leg a few inches off the floor, positioning your right leg in the most comfortable position. Loop the center of the belt around the instep of your left foot. Point your toes away from you to tighten your calf muscles and then pull your toes back to stretch your calf muscles. Hold the position for two seconds. Repeat 8 to 12 times and then stretch your right calf.

Proprioceptive Neuromuscular Facilitation (PNF)


What it is: The term Proprioceptive Neuromuscular Facilitation sounds like some high-tech, life-saving medical procedure used by doctors on “ER,” but really, it’s a simple method of stretching. You get into a stretch position, tighten a muscle for about 6 seconds, allow it to relax, and then hold a static stretch for 10 to 30 seconds. In theory, when the muscle is stimulated by contracting, more of the muscle fibers are triggered to relax. Some PNF stretches work best with the assistance of another person; others you can perform yourself. The best way to be taught PNF stretches is from a trainer who is familiar with the technique.
Check out these pros to PNF stretching:
  • Many studies, including some referenced by the ACSM, show that PNF stretching is a good way to increase your flexibility.
  • The tightening part helps strengthen the muscle being stretched. This is especially true if the muscle is injured and you can’t do the bending and straightening necessary to perform strength-training exercises.
  • Some studies have found that PNF stretching increases blood flow into joints and muscles, especially if they’ve experienced a recent injury.
  • PNF teaches you about your muscles. If you’re doing a PNF hamstring stretch, you need to know where your hamstring is and how it feels to tighten this muscle. This knowledge also comes in handy when you perform weight training exercises.
The cons of this type of stretching are
  • Many people find PNF stretching uncomfortable or even painful.
  • You need extra motivation to tighten a muscle as hard as you can for six seconds. Not everyone has the strength or the patience for this.
  • If you do PNF stretches with a partner, your buddy may be overenthusiastic and try to force the stretch beyond your capabilities, and then snap! Pay attention so that this doesn’t happen.
  • Avoid PNF stretches if you have high blood pressure, because the stretches may result in sharp, sudden increases in blood pressure.
Sample PNF Stretch (see Figure): This PNF stretch loosens up your hamstrings. Lie on your back with your left knee bent and left foot flat on the floor. Have your partner kneel on one knee in front of your feet. Raise your right leg, and place the back of your heel on top of your partner’s shoulder. Have your partner place one hand on your thigh, just above your knee, and the other hand on top of your shin. Forcefully press your heel down into your partner’s shoulder, and concentrate on tightening your hamstring as much as possible for six seconds.

Relax the muscle, and have your partner gently push your leg up and back without allowing the knee to bend. Hold the stretch for 10 to 30 seconds and repeat the stretch four times. Switch legs. To do the previous stretch without a partner, wrap a towel or stretching strap around your ankle or the back of your calf, and then pull your leg toward you as you tighten your hamstring and press it downward.

Stretching with Assistance


What it is: Assisted stretching is a traditional-type stretch that requires a partner. Your partner helps you into position and then gently helps you stretch further than you can by yourself. As with traditional, or static, stretching, you hold the position for 10 to 30 seconds without bouncing. The best way to figure out how to perform assisted stretches is from an experienced fitness trainer. While the ACSM’s guidelines don’t offer strategies for this type of stretching, the organization does reference it as promising and possibly effective.
The pros of assisted stretching are as follows:
  • Having someone else do a lot of the work for you is relaxing. This technique is particularly valuable for a tight muscle that you have trouble stretching yourself.
  • If have trouble mastering some of the common stretching positions, assisted stretching helps you understand the techniques while you develop enough flexibility to do them more comfortably on your own.
  • A partner tends to push you a bit further than you can push yourself. Assisted stretching also comes with its cons:
  • If you don’t have a partner, you’re out of luck (although some assisted stretches can be mimicked by using a towel or stretching strap).
  • If your partner overstretches you, you may end up injured.
  • Assisted stretching requires less muscle awareness than the other techniques, so you may not gain much from doing it.
Sample assisted stretch : This stretch focuses on your lower back and butt. Lie on the floor with your partner standing in front of your feet; relax your arms at your sides, and keep your head on the floor. Lift your legs, and bend your knees into your chest. Have your partner place her palms on your thighs and gently press down and in so your knees move even closer to your chest. As you hold this position, you should feel the stretch spread from your butt into your lower back.

Celebrating Traditions: Traditional Stretching


What it is: You hold each stretch for 10 to 30 seconds without bouncing. (Traditional stretching, also called static stretching, holds your body still.) As you hold the position, you feel a pull that spreads up and down the length of the muscle. Traditional stretching is the method performed at the end of many exercise classes and in exercise videos. While it may not achieve as much increase in flexibility as some of the other methods, it’s very safe, easy to understand, and has a low risk of injury.
Traditional stretching has some definite advantages:
  • Almost anyone can perform some static stretches; you can easily modify the position to suit your level of flexibility.
  • Many people find this method of stretching a good way to relax and to cool down after a workout.
  • If you perform traditional stretches at least three days a week, you’ll probably notice an increase in flexibility after a few weeks.
On the other hand, some cons coincide with traditional stretching:
  • If you’re inflexible, this type of stretching may be far from relaxing. In fact, it may be so uncomfortable that you end up skipping your stretches altogether.
  • Separating one muscle group from another with traditional stretches is difficult; you often are forced to stretch several different muscle groups at once. This situation is a problem if one of the muscles being stretched is tighter than the others.
Contrary to popular belief, you should never perform traditional stretching before you warm up. Stretching in and of itself doesn’t constitute a warm-up. See the sidebar, “Stretching guidelines,” to find out what constitutes a proper warm-up.
If you’re a stretching neophyte, start with 10 seconds of stretching and gradually work your way up to a full 30 seconds. Don’t bounce. Jerky movements may actually make you tighter. Get in the proper stretching position slowly and smoothly and then stay there. After you’ve held the stretch for a few seconds, slowly stretch a bit further.
Hold each of the following positions for 10 to 30 seconds.
  • Quadriceps (front thigh): Lie on your left side with your legs out straight and your head resting on your outstretched arm. Bend your right knee so your heel is close to your butt, and grab your ankle or toes with your right hand. Pull your heel back and toward your butt, taking care to keep your hips stacked directly on top of one another. Try to keep your knees together, not separated. Don’t arch your back or allow your butt to stick out. Use the image of trying to press your pocket forward and flat. After you stretch your right quadriceps, turn over (to lie on your right side) and stretch your left.
  • Hamstrings (rear thigh): Lie on your back with your left knee bent and your left foot flat on the floor. Straighten your right leg out in front of you along the floor, and flex your toes toward yourself. Slowly raise your right leg off the floor as high as you can without allowing your back or butt to lift up. As you hold this position, you feel a stretch through the back of your thigh. Clasp your hands around your thigh above your knee or use a stretching strap with loops to help raise your leg. (Using your hands or a stretching strap to help is an especially good idea if you’re not very flexible.) Lower your leg slowly and repeat the stretch with your left leg. Before you hold the stretch, you can use the strap to lower and lift your leg and explore your active range of motion. Be sure to relax your thighs and use the strap for support to maximize your stretch
  • The pretzel stretch (butt, lower back, and outer thigh): Lie on your back and bend your knees. Lift your legs up so that your knees are directly over your hips and your calves are parallel to the floor. Cross your left ankle over the front of your right thigh. Clasp both hands around the back of your right thigh and pull back with gentle, steady pressure. Keep your butt in contact with the floor. Don’t round hips up and off the floor. As you hold this position, you should feel the stretch spread through your left buttock and outer hip and through the center of your lower back. Repeat this stretch with your right ankle over the front of your left thigh.
  • Reach up (entire upper body and lower back): Sit up tall either cross-legged on the floor or in a chair. Make a loose fist with your hands, and raise your arms directly over your shoulders. Lengthen your right arm upward, as if you’re trying to touch an object above you that’s just out of reach. Hold this position for two to four slow counts. Without relaxing your right arm, stretch your left arm upward. Sit up tall and keep your shoulders relaxed as you alternate stretching each arm upward five times. Try to reach a little higher each time — without hunching your shoulders up to your ears. You should feel this stretch throughout the length of your spine, in the “wings” of your upper back, and in your shoulders and arms.
  • Hand clasp (chest, shoulders, and arms): Sit up tall either on a chair or cross-legged on the floor. Lean a few inches forward from your hips and clasp your hands behind your back. Drop your shoulders and shoulder blades downward as you lengthen your arms out behind you. You should feel the stretch across the top of your chest, in your shoulders, and along the length of your arms. If you don’t have enough flexibility to clasp your hands together, hold an end of a towel in each hand.